Designed to make day-to-day operations easy and less time-consuming, the WhatsApp Broadcast feature allows the creators to send a message to several contacts simultaneously.
Here’s an easy-to-follow guide that you can refer to in order to create and/or send WhatsApp Broadcast messages via Exly.
Step 1: On the Creator Tool page, scroll down to the Sales & Marketing section on the left side of the screen and click on WhatsApp Broadcast card.

Step 2: You will be redirected to a new page. Click on Create Whatsapp Broadcast to start with the next steps.

Step 3: On the page that opens, you can see a variety of ready-to-use WhatsApp message templates.

You can choose from
Community Invitations: Templates to invite customers to a community, give them updates and reminders.
Sales Offers: Templates to help you share discount codes and limited time offers with your users
Lead Conversions: Attract new customers with offers and grow your audience.
Offering Launch Announcements: Templates to help you announce new offerings and programs.
Subscription Renewals: Get people to renew their subscriptions by giving them discount codes and offering limited time offers
No Discount Messages: Share details of your program with your audience and get people to enrol in it.
Festive Wishes: Tired of sending all business messages? Lighten up your community by sharing festive wishes and keep the people engaged
Step 4: Click on the message type you want to send and select a template from the drop down options. Once chose, click Next to add the details in the message
With the Preview screen on the right side of the page, you can see how your broadcast message will appear to your customers.

Creating Custom Message Templates:
If you don’t want to use any of the given templates and create one of your own, click on Create Custom Template and write a new message.
A new screen will open where you’ll have to add the details for your new templates. Start by adding the template details such as the template name, template category and the template language.
It is important for your WhatsApp message template must fall into one of the following categories (in the dropdown). Templates that do not align clearly with these categories are more likely to be rejected by WhatsApp in the template approval process.
If you are not sure which category to choose, go ahead with the 'Marketing' category.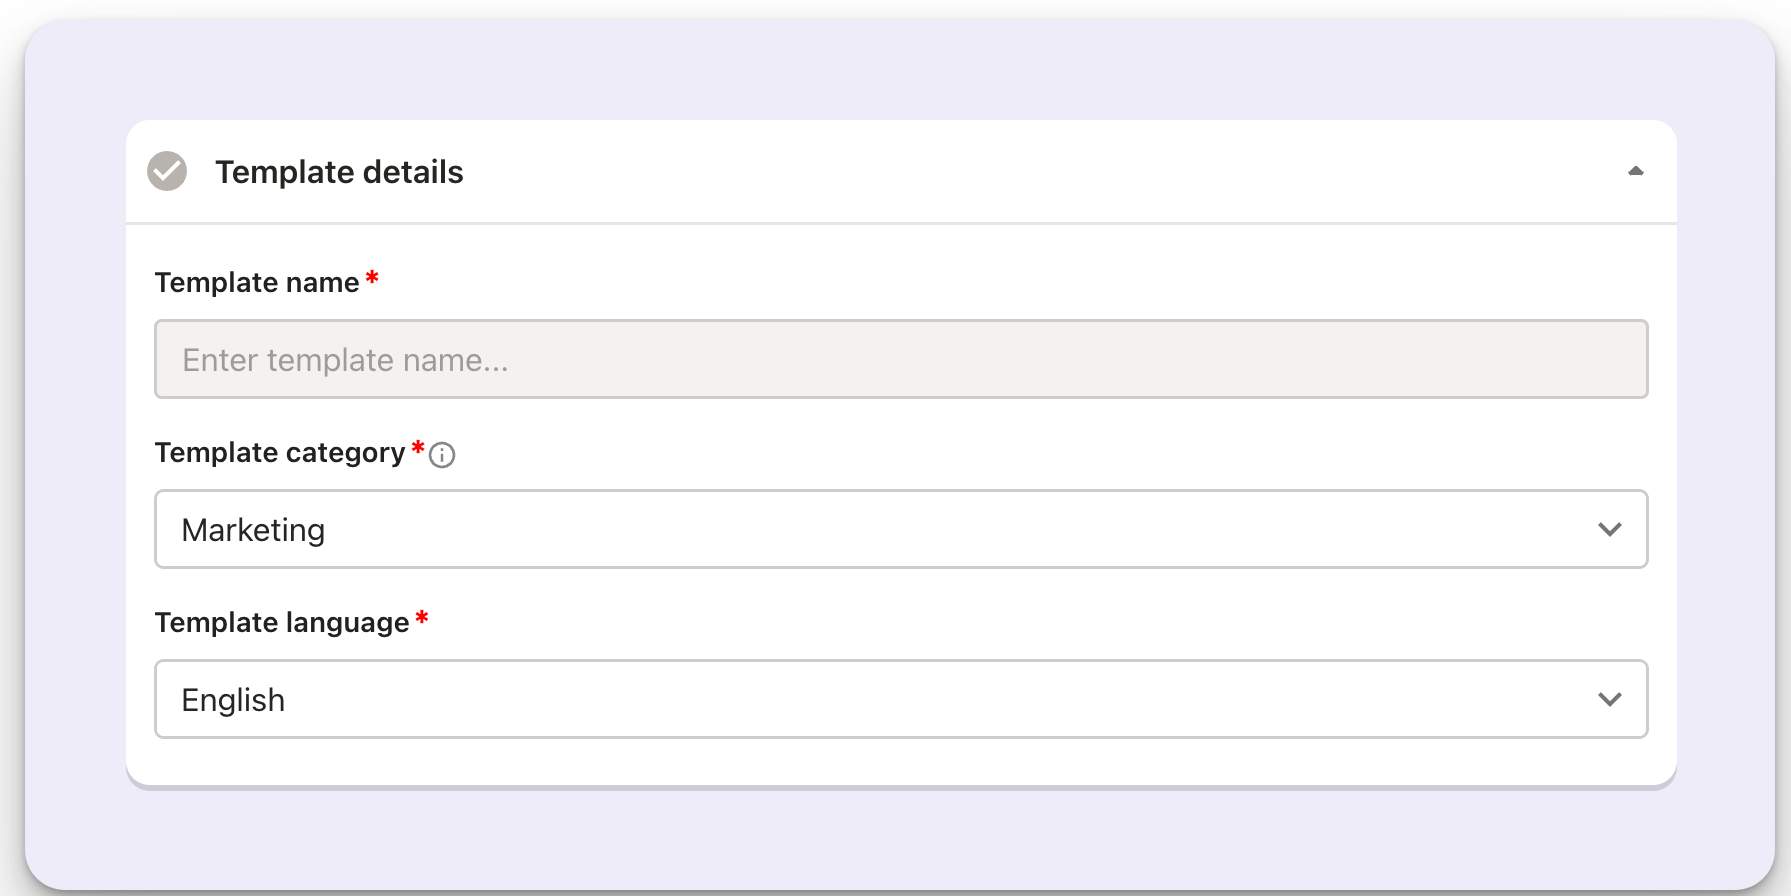
After adding the template details, now move on to add the message details.

You can pick a header for your template too. It can either be an image, video, a text or a document.
Add the main body of your message and a footer. You can also personalise the message by adding variables that will change according to the offerings and person’s details.
Check the meta guidelines for creating template to know more.
A footer appears at the end of your message - you can add your business name or any statement that helps differentiate your business. Even though adding a footer is optional, it is still suggested to add one as it makes the message more professional.

Adding buttons can improve the traction and make it easier for users to take actions. In your broadcast templates you can add maximum of 2 buttons.
One button can have a link and the other button can have a phone number. You can add only one button for each type.
After adding all the details and creating the template for your message, you can see a preview on the right side of the screen.
Once satisfied with the messaging, you can now send the template for approval.
Once you submit the template, we send it to the Meta team for approval, it may take 30 minutes to 2 business days for it to be approved.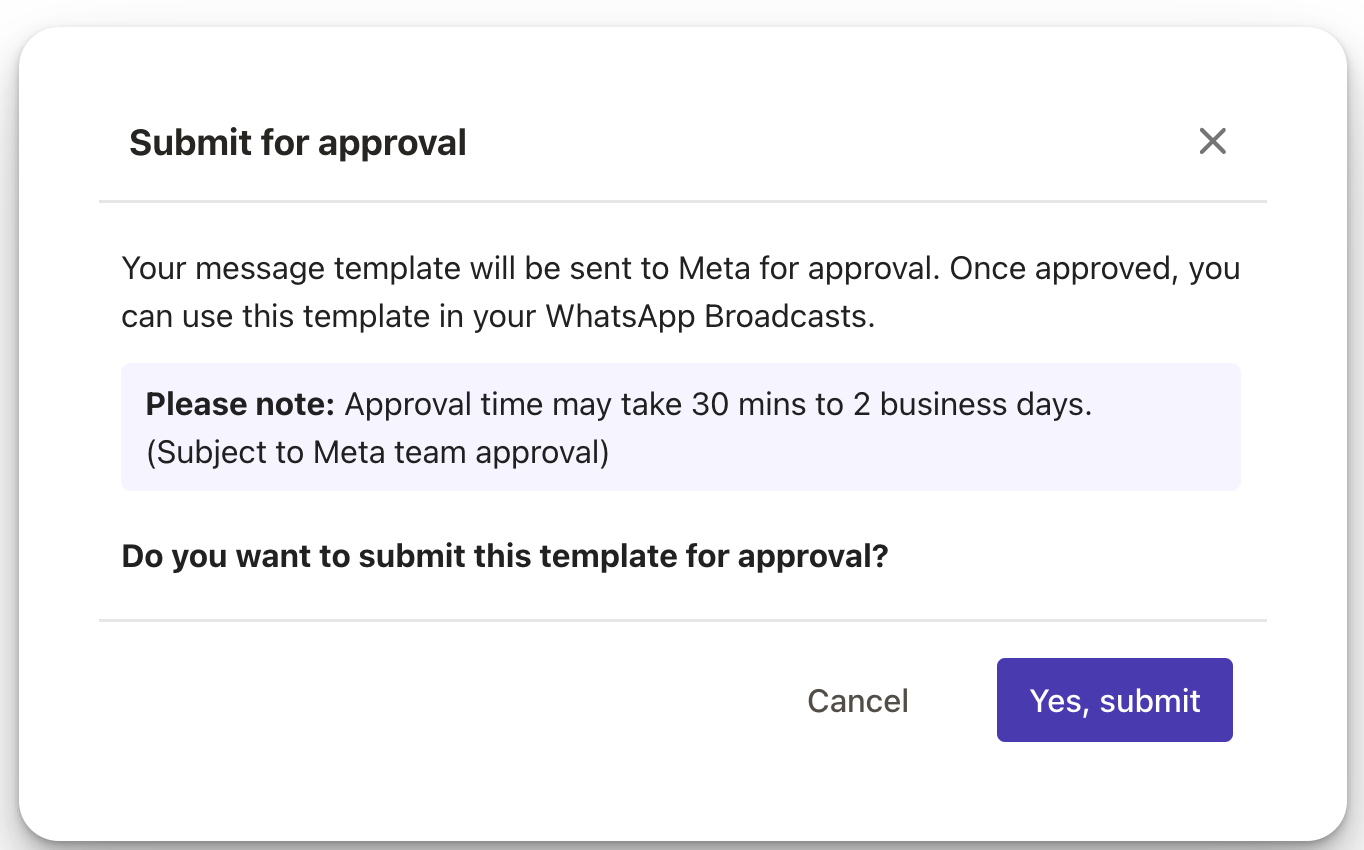
All the templates you’ve created can now be seen in My Templates. Here you can check all the approved, pending and rejected templates. You can also view the templates that are in draft.

Step 5: Now that you’ve selected the message you want to send, add campaign details like Campaign Name, Offering Name, Group Link, Business Name, and Select the Customers you wish to send the message to.

Fill in the details in all the mandatory fields. You can even add supporting media - images, videos and documents to these WhatsApp templates before you finally broadcast them. Here is how you can add:
Images: Select Img from the Message Details. You can choose stock images or also upload your own media from your device. Before you upload the image remember that the maximum file size allowed is 5MB and the image aspect ratio should be: 1.91:1
Videos: Select Video from the Message Details. You’ll get the option to upload the video from your device. Before you upload remember that the maximum file size allowed is 16MB. The maximum video duration will vary based on the quality of the device with which it was recorded
Document: Select Doc from the Message Details. You’ll get the option to upload the file from your device. Before you upload the doc remember that the maximum file size allowed is 100MB and only .pdf files can be uploaded.
Now select the segment of users you want to send the broadcast to.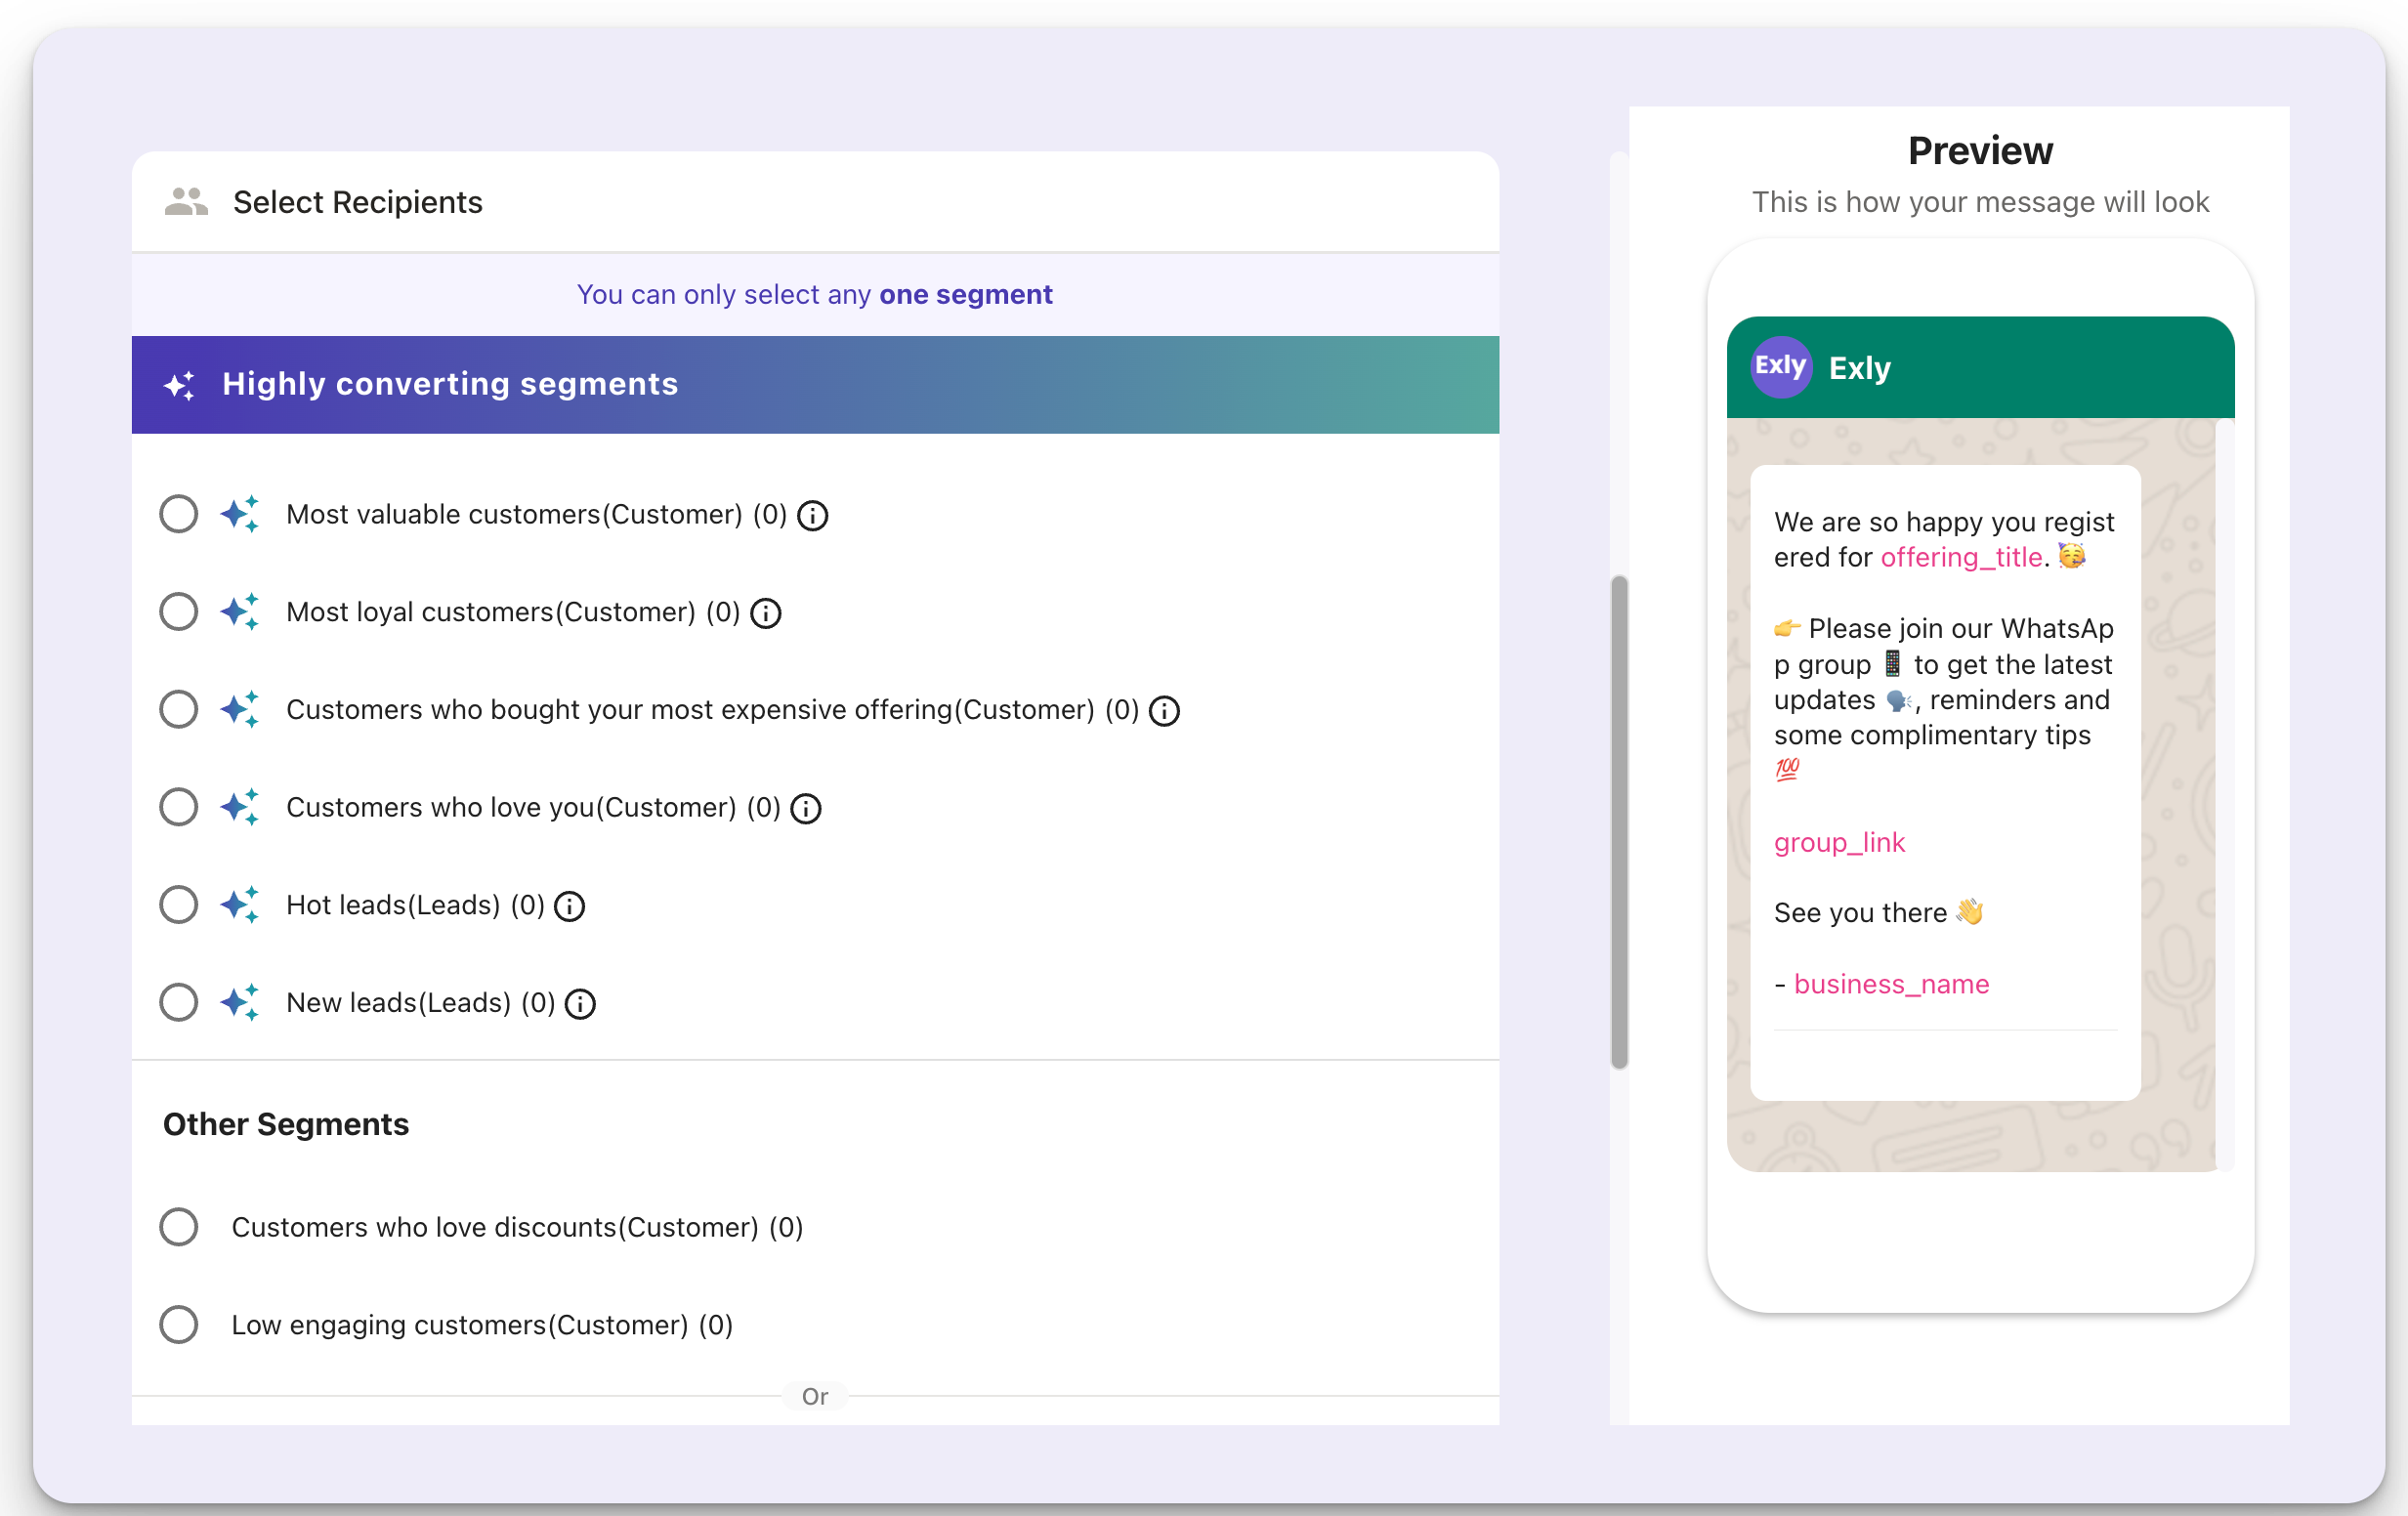
For offerings with part-payment customers, you can select one-time payment and part-payment customers separately or combined, giving you complete control over your audience selection.

You can also manually add phone numbers that you wish to send the WhatsApp broadcast message.

When you fill in all these details, all the changes you make will reflect in real time on the Preview screen that appears on the right side.
Step 6: After you have added all the details, click on the Broadcast Now button to send the message or you can also choose to specific the message to be send at a specific time.
Note: If a WhatsApp campaign message is undelivered due to Meta’s frequency capping or any other reason preventing Facebook from sending it, our system will automatically retry sending it.
The automated Retries feature ensures a higher sent rate in WhatsApp campaigns by automatically resending messages if they fail due to Meta’s frequency capping. This means you can reach more customers without manual intervention, increasing your campaign’s potential revenue.
You can set the retry duration while creating a WhatsApp broadcast, and our system will attempt to resend the message every 24 hours until the chosen date, eliminating the risk of manual errors.
Please note that this feature applies only to WhatsApp campaigns and does not extend to automated communications or listing-specific messages.
Step 7: You can keep a track of the number of people a specific broadcast message was sent to, delivered to, and opened by along with the open rate (in percentage).

Was this article helpful?
That’s Great!
Thank you for your feedback
Sorry! We couldn't be helpful
Thank you for your feedback
Feedback sent
We appreciate your effort and will try to fix the article