Organizing refers to developing a structure or process for people, positions, and activities of a business. So if you have a team that handles different aspects of your business and helps you run it, then the Add/Manage Staff tool on Exly will help you form effective responsibility-accountability relationships.
You can provide each member limited access to different Creator Tools depending on their role in the functioning of your business. For instance, you can add your customer support team as Support Staff on Exly.
Or when someone is managing your business but you don’t want them to have access to the transactions and bank details, then you can simply add them as a Manager.
How to Add/Manage Staff efficiently on Exly?
Exly understands a creator’s need to have a systematic process set in place to facilitate the better organization of their business and their webpage. And this easy-to-follow guide on how to use the Add/Manage Staff tool on Exly in an efficient manner always comes in handy:
Step 1: On the Creator Tool page, scroll down to the Workflow Tools menu on the left side. Click on Add/Manage Staff.
Step 2: On the screen that opens, you will see the option to manage your organization and assign members to different positions/roles.
From here you can either add members to your organisation or edit the actions of each role.

Each of the above-mentioned positions/roles has different types of access and restrictions when using the Creator Tool page
Owner:
The owner has complete access to the dashboard and has a bird's-eye view of all activities of the business.
They can manage the webpage - edit the details and design, and even add FAQs.
They can create/edit offerings. They can choose to assign an offering to a specific staff member or by default, have it assigned to themselves.
On the Add/Manage Staff tab, they see 6 blocks on the Manage Organization page. And they can add/remove members as they deem fit.
They have access to all bookings. They can choose to view a specific member’s bookings by selecting the member’s name from the Staff dropdown menu.
They have complete access to all product orders and content purchases along with the price paid details.
They have access to both global leads (manually assigned to a staff member by the owner) and local leads (automatically assigned to the member that the offering belonged to)
They have complete visibility on all business transactions, access to bank account details, and all customer data including the total spent amount.
They have access to the complete Sales, Integrations, and Communication sections.
Manager:
While the Manager doesn’t have any access to the dashboard, they can manage the webpage - edit the details and design, and even add FAQs.
They can create/edit offerings on the Creator Tool page.
They have access to the data for all bookings, product purchases, and content purchases, however, they can’t see the price paid for the same by the end-user.
They have access to the complete Sales, Integrations, and Communication sections.
While they have access to the Add/Manage Staff tab, they can’t add an owner or co-manager. They only see 4 blocks on the Manage Organization page - The Support Staff, Primary Staff, Secondary Staff, and Tertiary Staff.
They don’t have any visibility on the business transactions or the total spent amount.
They have access to bank account details but the number is all encrypted except the last 4 digits. The PAN number isn’t visible to them.
Support Team:
They can only view offeringss assigned to them under the My Offerings option. However, they cannot create or edit anything.
They have access to the data for all bookings, product purchases, and content purchases, however, they can’t see the price paid for the same by the end-user.
For Automated Messages under the Communications tab, they can only see and not edit the messages sent to users. And they have access to text only in the status column. No action column is visible to them.
They don’t have any visibility on the business transactions or the total spent amount.
Primary Staff:
While the Primary staff has access to the dashboard, it only has information pertaining to their own offerings. No views are visible.
They can only view offerings assigned to them under the My Offerings option. They don’t have the access to create or edit anything.
They have access to the data for all bookings, product purchases, and content purchases along with the price paid for these by the end-users.
They have visibility on their business transactions along with data about all customers and their total spent.
They have access to all integrations.
Secondary Staff:
While the Secondary staff has access to the dashboard, it only has info pertaining to their own offerings.No views or transaction information is visible to them.
They can only view offerings assigned to them under the My Offerings option. They don’t have the access to create or edit anything.
They have access to the data for all bookings, product purchases, and content purchases, however, they can’t see the price paid for the same by the end-user.
They have access to all integrations.
Tertiary Staff:
With restricted access, the Tertiary Staff can only view offerings assigned to them under the My Offerings option. They cannot create or edit anything.
Editing permissions for each role:
Each role comes with predefined permissions but you can make changes and edit the default permission setting according to your business.
To do so, click on Roles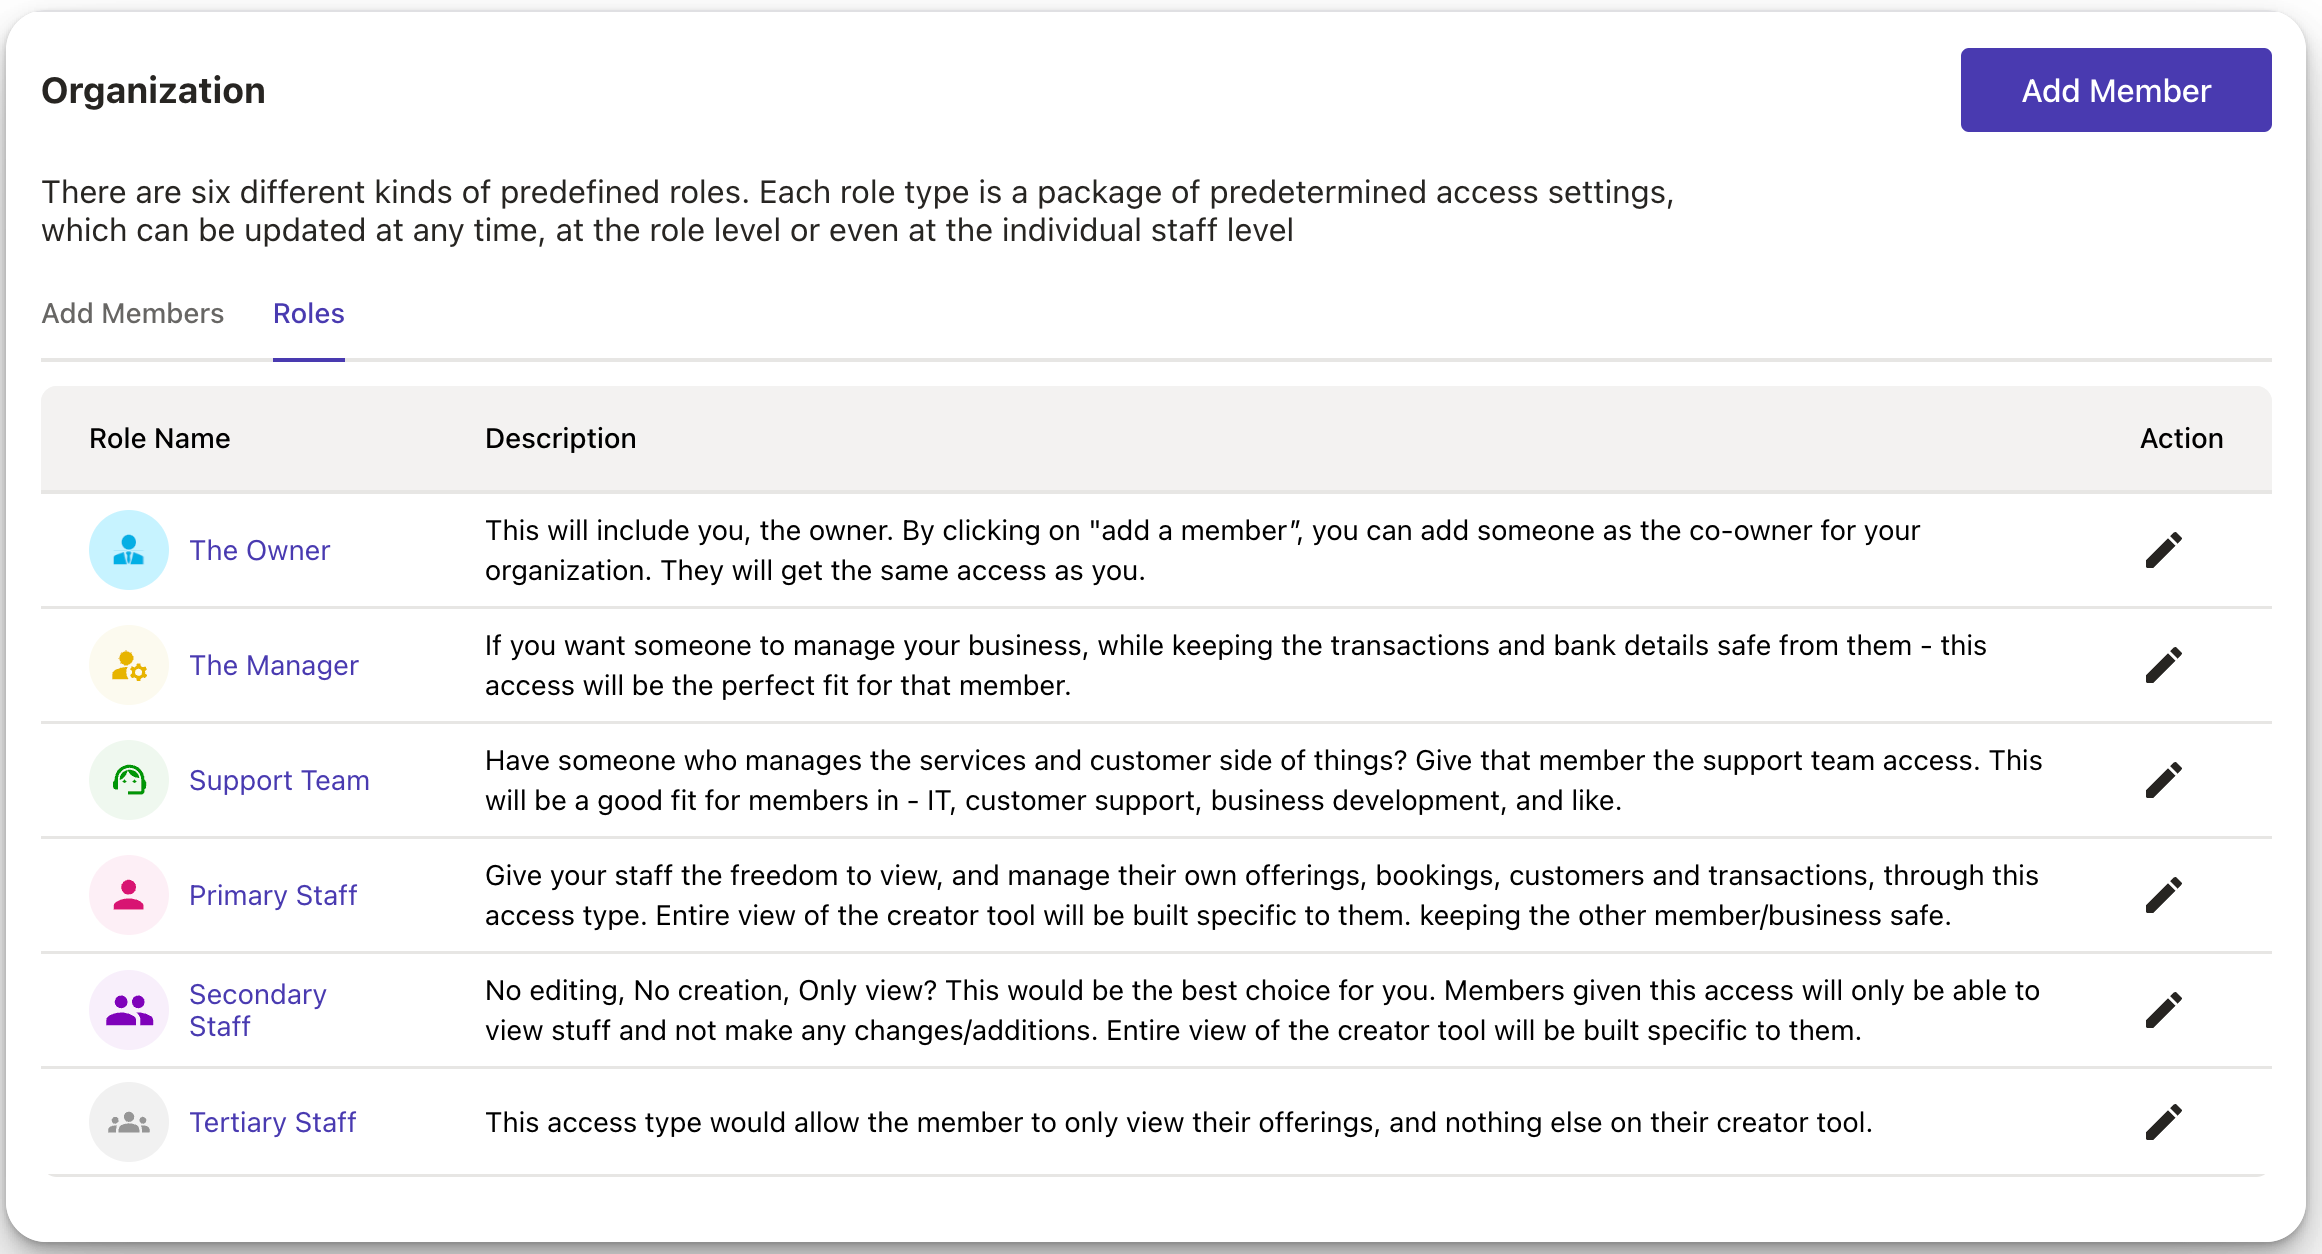
Click on the role that you want to edit. A new screen will open where you can see all the read and write permissions for that role.
From here you can edit the access permissions of the user. You can give Write(editing) permission and Complete visibility only when the role has been given Read permission for that particular task.
Adding members to you organisation:
Step 3: To add a member to the position/role of your choice, click on the Add Member button
In the new screen that opens, fill in the required details - first and last name, email id, role, designation, description, contact details, etc.
Ensure that the image ratio of the photo that you want to upload is 5:7 and the dimensions are 11” x 14”
Step 5: Once you have filled out all the details, you can choose whether or not you want to make the profile visible on the host page by clicking the check box.
You can also tick the box to auto assign the leads to this member.

Step 6: Add all other optional details. Even though you can add the member without filling in the optional blanks, it is still advised to add all necessary information of the member.

Step 7: Click Next to go to the Role Permissions page.

Here you can change the access permissions for a particular member.
Step 8: Once you’ve added all the details and confirmed the access permissions, click on Confirm.
You can now see the member on the main page of Add/Manage staff screen.

Step 9: To view the activity and details of the member, click on their name or click on the three dot menu and select view View profile/activity

Step 10: From the new screen, you can now view the upcoming schedule of the member along with their stats like
Revenue: The total revenue generated by this member
Customers: The total number of customers this members has
Leads: The total leads (earned or assigned) to this member
Bookings: The total number of bookings of offerings
Click on View in the bottom of each stat to get a detailed view.

You can also check the activity of the member by clicking on Activity Log.
Step 11: Assigning offering to a member can be done from this screen.
Click on Assign Offering in the top right of the screen and select the offering you want to assign.
Was this article helpful?
That’s Great!
Thank you for your feedback
Sorry! We couldn't be helpful
Thank you for your feedback
Feedback sent
We appreciate your effort and will try to fix the article