A domain name is an easy-to-remember, unique name/address where your official website can be found on the internet. If someone were to look up your website online, they can simply search for it using the domain or subdomain name. When you create your webpage on Exly, you get a default subdomain name.
For example: Say your webpage is called “sugarfix”, then your default subdomain with Exly would be sugarfix.exlyapp.com
How To Set Up A Pre-Existing Domain Name On Exly?
Apart from Exly, there are other domain providers like GoDaddy, Google, Namecheap, etc. which are quite popular among creators. In case, you have a pre-existing domain name that you want to connect with your Exly webpage, simply follow our step-by-step guide to do so:
Step 1: On the Creator Tool page, click on the Integrations option listed on the left side and select Domain Linking.
Step 2: A window will open giving you a step by step guide on linking your domain.
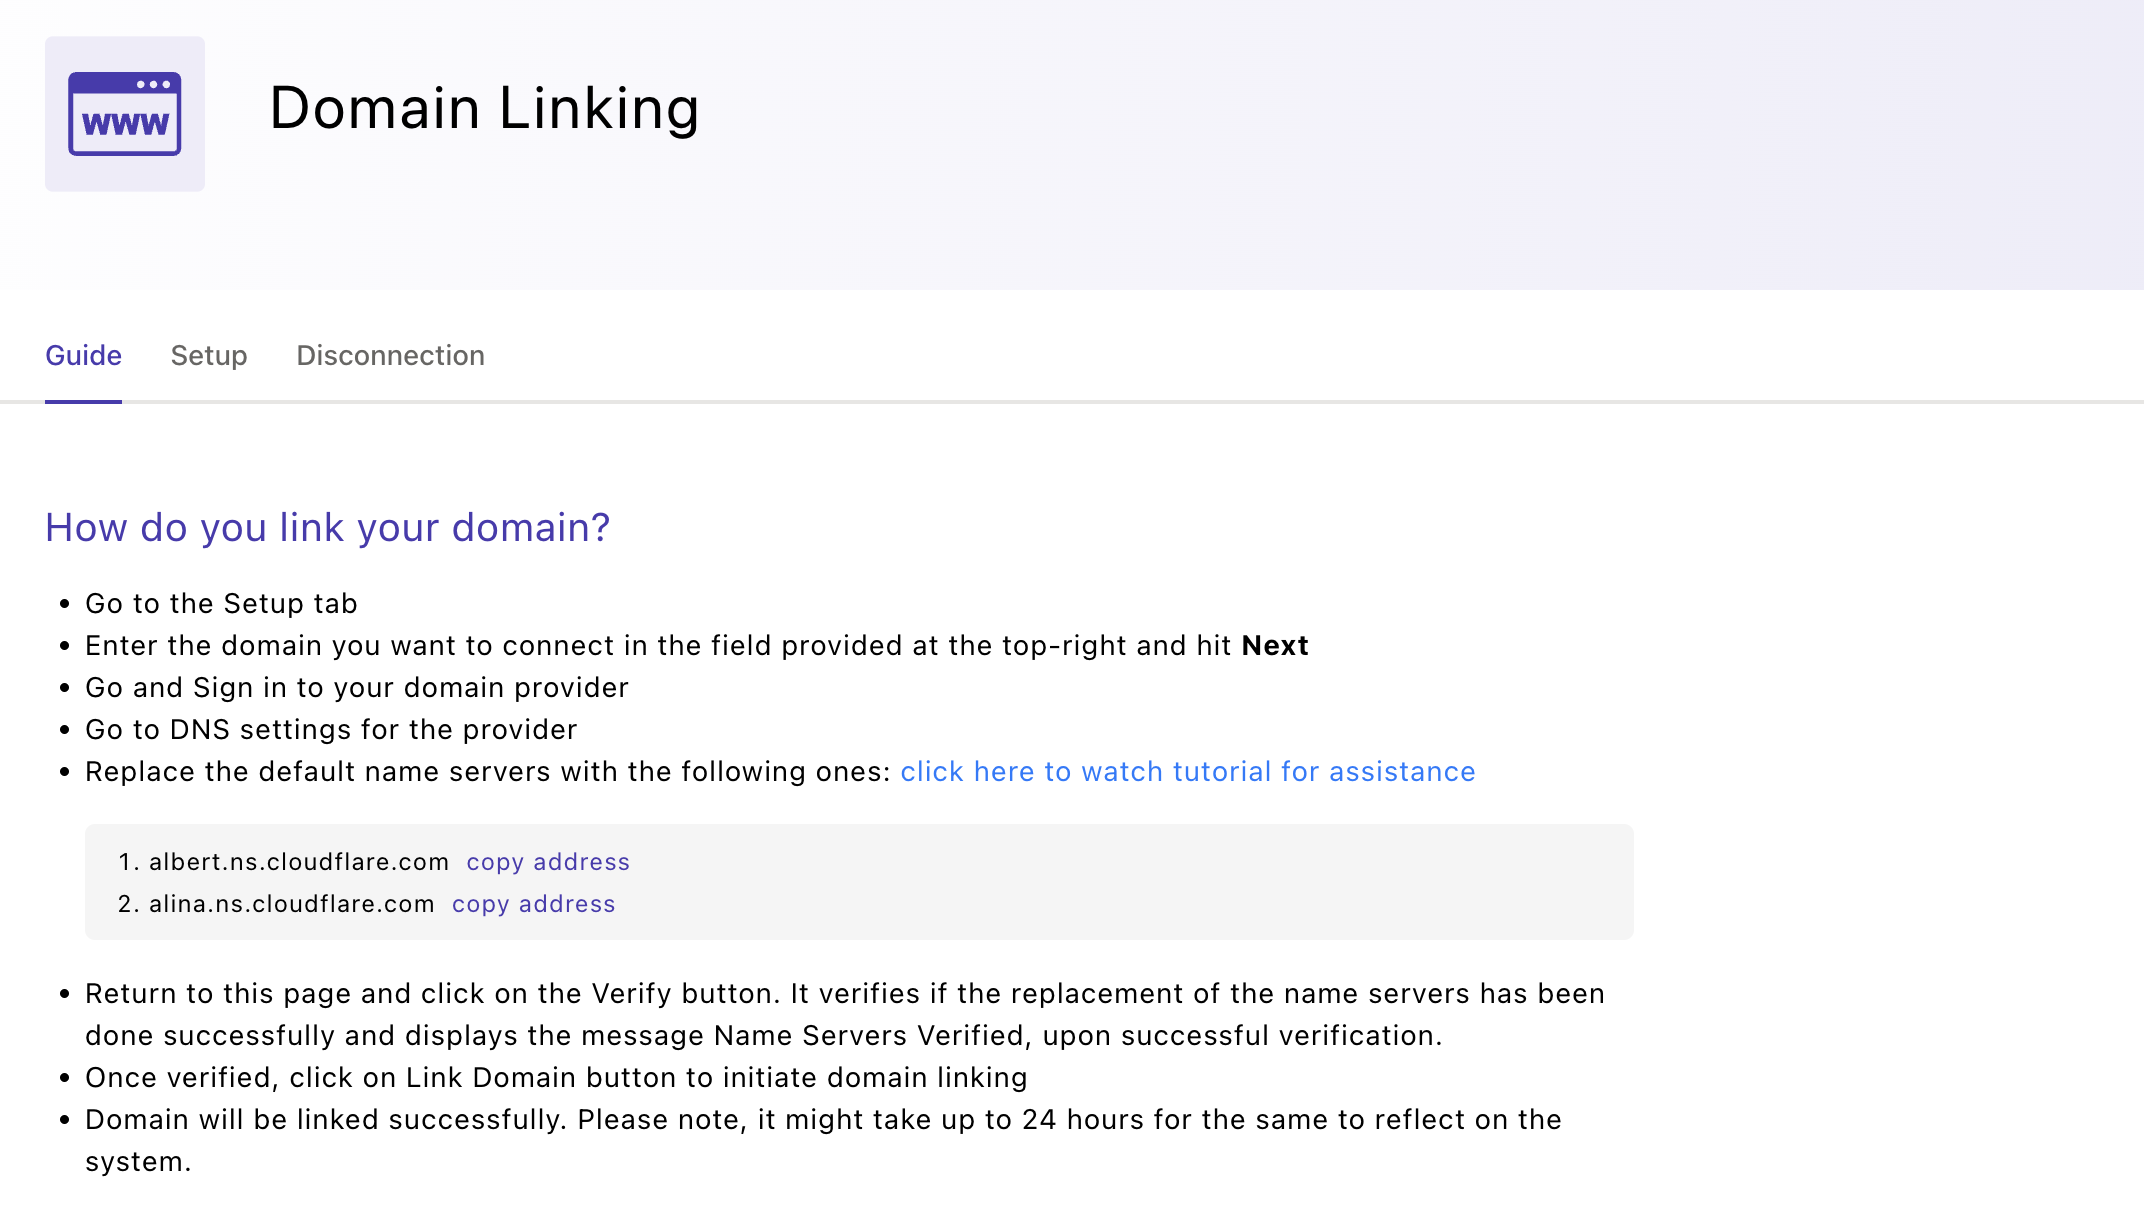
Once you’ve gone through the guide, click on Setup to link your domain. The Setup tab displays domain linking status, DNS record information, and an option to add DNS records.
Step 3: Type in the domain/sub-domain ID in the text box, and click on Next. Once you add the existing domain/sub-domain name or id, you will be asked to verify the same.

A DNS or Domain Name System is an internet system that translates alphabetic names into numeric IP (Internet Protocol) addresses. If something is connected to the internet, then it has an IP address, whether it is your phone, laptop, or any website. These systems make it easier for humans to look up a website by using its domain name while the commuters connected to the internet use the long, numeric IP addresses.
You can save your DNS records (MX and TXT records) before linking your domain/sub-domain. MX records are a type of DNS records that tell other services where to deliver emails for a domain, while TXT records are a type of DNS records that provides text information to sources outside the domain. You can add, edit, and even delete them.
Adding MX Records requires:
Name: Alphanumeric, hyphens, and periods (max 63 characters)
Mail Server: Must match the hostname format and domain name
Priority: Integer between 0 and 65535
Adding TXT Records requires:
Name: Alphanumeric, hyphens, and periods (max 63 characters)
Content: Alphabetic, numbers, and special characters (max 255 characters)
Remember that your data will not be auto-saved, so in case you exit the page without saving the changes, all progress will be lost. Upon saving the DNS records, the data is sent to Cloudflare via Exly after you've successfully linked your domain.
Step 4: Sign in to your domain provider and go to DNS settings for the provider. Replace the default name servers with the following ones: click here to watch tutorial for assistance

An easy-to-follow guide for changing the DNS and nameservers on GoDaddy:
Nameservers are the servers that have a Domain Name System. Each time someone tries to search for a website using the alphabetical domain name, the nameservers help the browser know where the website is located, the name is converted into an IP address, and the page/website that you were looking for loads.
Step 1 : Log in to your GoDaddy account and open the drop-down menu from the top right corner.
Step 2: Scroll down to the Account menu and click on the My Products option.
Step 3: Once you are on the products page, scroll down and click on Domains to change the nameserver of your domain.
Step 4: On the right side of the domains page, you will see a Quick Links section, choose the Manage Domains option.
Step 5: Scroll down to the last section of the page and click on the ‘Manage DNS’ option on the right side.
Step 6: Now go to Nameservers and click on Change to change the default nameserver.
Step 7: Edit it by choosing the Enter your own nameserver option on the bottom. Type in or copy and paste the new nameservers, and click on the Save button to keep and apply the changes.
Step 8: A disclaimer window will appear, read through that, and then click on the check box to give your consent for the change and confirm it by hitting the Continue option.
Congratulations, you have successfully changed the nameserver of your domain!
Reload the page to see if the changes have been saved successfully.
Note that it usually takes about an hour for these changes to come into effect, and it can sometimes take up to 2 days (48 hours) for these changes to update on a global level.
After linking the domain, you can manually add the saved DNS records as needed.
Step 5: In case you wish to delink your Domain/Sub-Domain from Exly, you can easily remove it from the Disconnection tab itself. Before you proceed, you'll see a brief explanation of how delinking might impact your setup, conveniently displayed above the delink button. This ensures you're fully informed before making changes, helping you manage integrations confidently and seamlessly.
What happens after you click the Delink Domain button?
All Exly webpages and shareable links will automatically revert to your last set Exly domain
The domain setup process will reset, and the Setup tab will start from Step 1 with an empty domain field
The Delink button will be disabled once the process is complete
Any existing DNS records associated with your account will be removed
Was this article helpful?
That’s Great!
Thank you for your feedback
Sorry! We couldn't be helpful
Thank you for your feedback
Feedback sent
We appreciate your effort and will try to fix the article