Why it is beneficial to run ads for your offering?
Running Facebook and Instagram ads for a service or product is like having a personal digital billboard strategically placed in front of your ideal audience. In today's digital landscape, these platforms offer a powerful opportunity for creators and businesses to connect with potential customers who are actively engaged and primed for discovery.
Imagine being able to showcase your offering to a highly targeted group of individuals who share specific interests, behaviors, or demographics that align with your ideal customer profile. With the ability to fine-tune your ad targeting, you can ensure that your message resonates with the right people at the right time, increasing the chances of capturing their attention and driving conversions.
On Exly, you can easily run Facebook and Instagram ads. Read this easy-to-follow guide on how to do so:
Step 1: On the Creator Tool page, scroll down to the Sales and Marketing menu on the left side and click on Run Facebook/Instagram Ads card.
Step 2: From the new window that opens, click on Create an Ad to begin the process.

A pop will appear where you have to select what offering or sales page you want to run the ad.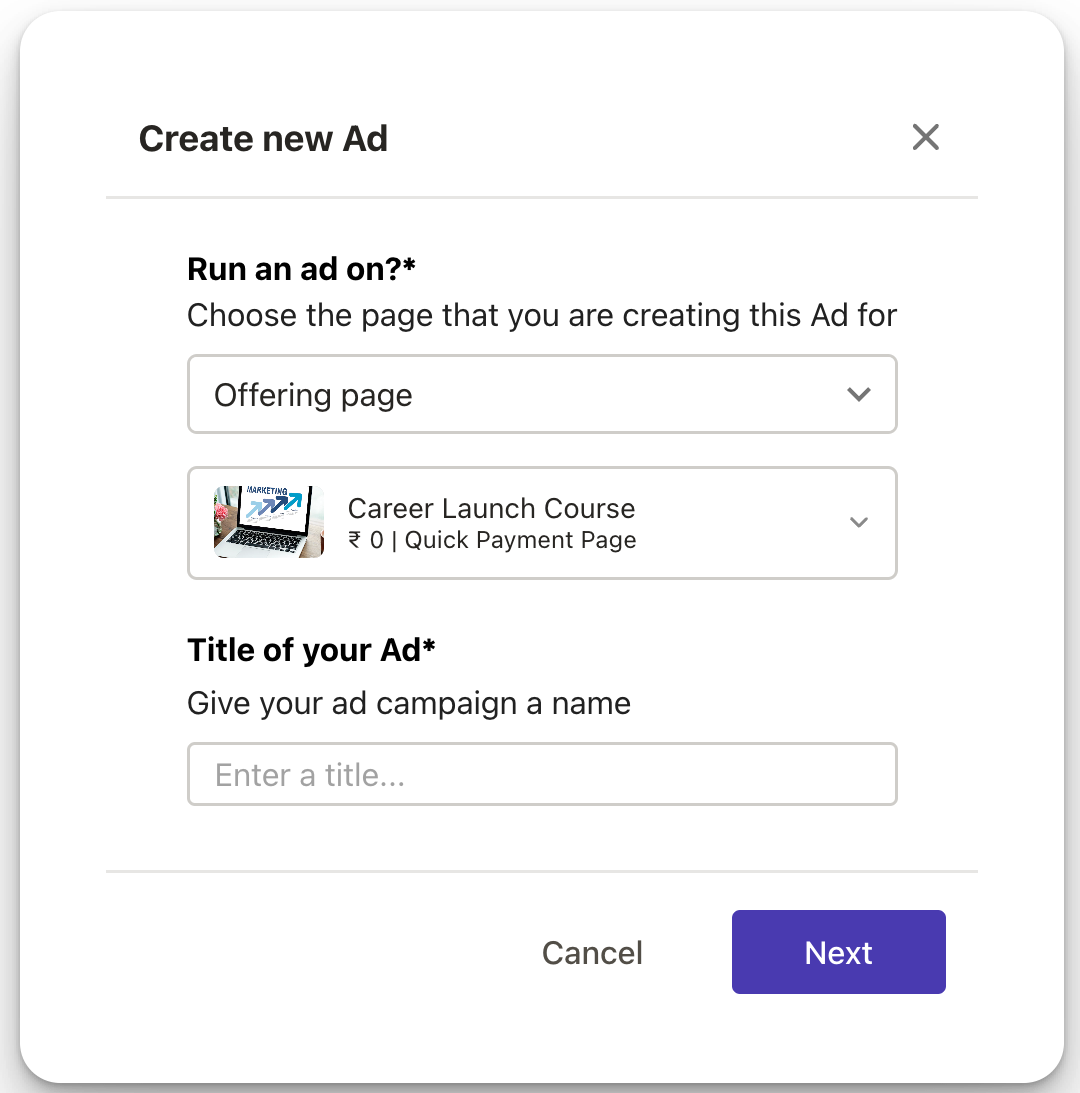
After selecting the Offering/Sales page, give your ad campaign a suitable title and click Next.
Step 3: To create an ad, you will have to go through 4 steps
Designing an Ad templates
Choosing the personal you want to target
Setting the budget for your ad
Scheduling the release by setting the date and time.

You can click on Save As Draft at any point of time while creating this ad and continue making the edits later.
Step 4: Click on Designing an Ad template.
A window with Ad templates will open from where you can pick the design you like the best. You can choose from templates that are Basic , Detailed or added by you locally.
Basic Templates: Designs with a heading, time, date and all basic information regarding an offering
Detailed Templates: Designs where you can add indepth information and bullet points about the offering
My Templates: If you want to use templates that have been created by you, click on My templates and upload them from your local device.
You can also select multiple designs and create a carousel. However, multiple templates of only same types can be selected, that is you cannot have 2 templates from basic designs and 1 from details designs.
Click Next to start editing the design.
For each design you can add/edit text, upload an image, edit the colour scheme and even add stickers.

Click on each tab and fill in the details from the drop down menu. Learn more about editing Marketing Creatives.
Click Next after to add details for your ad post. Just an image won’t be enough to attract the audience, having the right messaging and headline can go a long way.
Add the name, message, and a short description. For the ad message, the recommended text length is 125 characters for the message. However, your text may be truncated across various placements and devices. We recommend keeping your text as short as possible to limit truncation.
The website URL and Headline have been pre-filled based on the offering/sales page you selected and cannot be edited.
At last an appropriate Button label and click Next and move to the next steps.

At all times, you can see the preview of the ad in real time on the right side of the screen.
Step 5: After you’ve finalised the design, the next step is to choose the persona you want to target through this ad.
It is one of the most important step. The ad you’re creating would only be effective if you’ve picked the right audience for it.
Here, you can either pick from the default personas we’ve created or choose to create a custom persona of your own.

For each persona you can see the target audience’s gender, age bracket, location and interest in the card along with an estimated audience reach on the top. For one ad, you can select only one persona.

If you wish to add or omit certain sections from this default persona, you can always click on Edit Persona to make the required changes.
This newly edited audience will now be visible in Custom Persona Tab.

To create a persona from scratch, click on Create Custom Persona card from the Custom Persona tab.
In the pop up, add the details of your target audience.
Add a distinct name for the persona you’re creating.
Add the gender and the age bracket of the people you want to show your ad to
Add the state of your target audience. If you want your ad to be shown across country, type India in the field.
At last, add the interests of the people who would find your offering helpful.
For each field you add, you can see the reach of the estimated audience in real time.

Click Save to add the persona. After selecting the desired persona, click on Next.
Step 6: Set the budget and the duration of the ad.
You can choose the number of days you want to run this ad for. Facebook recommends running your ad for at least 7 days to see meaningful results. This way, you can track its progress and make data-driven decisions for better performance
Now set the total budget for the ad. In the box below, you can see the total payable amount after adding the taxes.

Click Next to move to the last step of adding a release Date and Time.
Step 7: Choose the date and time, when you would like to publish this Ad. You can find this ad under Scheduled ads later. Here you can also see the duration time for how long do you plan to run this Ad

Step 8: Now that you’ve added all the nexessary details for the ad, click on Review to revisit the details again. Make sure you recheck the persona, budget and schedule time carefully before making the payment as you won’t be able to change it later.
Make the payment for the ad and wait while it is in Review.
You can check all your ads in the respective tabs.
Live: Ads that are currently running
Drafts: Ads that you are editing but have not been saved
Under Review: Ads that you’ve made a payment for and are under review
Scheduled: Ads that have been approved and are scheduled to be released
Ended: Ads that have completed their duration and ended

Was this article helpful?
That’s Great!
Thank you for your feedback
Sorry! We couldn't be helpful
Thank you for your feedback
Feedback sent
We appreciate your effort and will try to fix the article
