When you create an offering for Courses, you are doing it with the intent of uploading a course using recorded audio, videos, and documents.
You can use this offering to offer your users short or long online video courses, PDFs, e-books, tutorials, guide documents, or a blend of one or more things. You can also add assessments and forms for your users to test their progress. Here’s how you can create and publish Courses on Exly:
Step 1: From the Create A New Offering page, go to the Courses: Recorded Videos/Files card and click on
Start Creating.
Fill in the details in the Title and Price for the course. Now, click on Next.

By checking in the 'Enable DRM' checkbox, you allow your content to be protected against piracy by the addition of watermarks in your images, videos, PDFs, etc.
If you already have a similar offering, you can choose to duplicate that and make this process simpler.
Step 2:You'll automatically be redirected to a new page wherein you will have to fill out more details about the offering like the course title and course structure.

You'll also see an Editing Panel where you can view, edit and add all your content.
Let's now walk you through everything on this page in detail:
Under the Course Structure section, click on Add New Section every time you wish to add a new section or a new lesson.
Step 3: Add and edit details in each section and lesson in the Editing Panel that appears on the right side of the page.

You can add a variety of elements like videos, images, text, files, links, forms and assessments to each lesson.
Here’s a step-by-step guide on how to add each element to any lesson:
Video: Click on Video and a new window will pop up.
To add a video, you can either upload one from your device, import it from your Google Drive, paste a URL, or use existing videos that you may have uploaded to your Media Library in the past.
After uploading, select the video you want to add by clicking on Add Selected.
You can also edit the video title by clicking on the pencil icon. Ensure that the length of the Title is between 3-100 characters.
Once you have added the details and links, click on Save or Save and Continue.
Image:
Click on Image and a new window will pop up.
You’ll get two options in the top bar - Media Library and Google Drive. Here you can choose if you want to upload images from your device or by using your google drive.
After selecting the image, click on Add Selected in the lower right of the screen.
Once the image shows in the Editing Panel section, you can now use the pencil icon to change the title of the image or past a URL.
Text:
Click on Text and a new window will pop up.

You can add the text in the text box and format it as per your requirement.
Once you have added the details and links, click on Add Text.
File:
Click on File and a new window will pop up.

This is a place for you to add any kind of supplementary media — images, PDFs, templates in word doc or Excel sheet, an MP3 file, etc. To add something here, you can either upload it from your device, import it from your Google Drive, paste a URL, or use existing media that you may have uploaded to your Media Library in the past.
Give all your files appropriate titles.
Once you have added the details and links, click on Add Selected.
Link:
Click on Link and a new window will pop up. Add an appropriate Title for your link.

Add the link in the URL field.
Once you have added the details and links, click on Confirm.
Embed:
Click on Embed and a new window will pop up.

Add a title for your embed
Paste the embed code in the space below and click on Save
Exam:
Click on Exam and a new window will pop up.

You’ll have 2 options to choose from
Automatic Scoring: Assessment will have close ended questions like MCQs. Each result submission will be auto-graded based on the marking scheme and feedback provided by you.
Manual Scoring: Assessment will have both close and open ended questions. You’ll have to manually evaluate each submission to score them

After picking the scoring type of your choice you’ll come to a screen where you can now create your assessment.
Remember, if you select ‘Automatic Scoring’, you can add only single MCQ and multiple MCQ type of questions. However, if you select Manual Scoring, you can select questions of multiple types like text and file upload along with single and multiple MCQs.
You can start by using our pre-defined templates or start creating it from scratch.
If you select a template to edit, you’ll be redirected to a screen where sample questions have been added and you can edit them as per your course.
If you want to add new questions, here is how you can do it:
You can even mark certain questions as mandatory using the toggle button. Students will be required to answer these questions before moving forward.
Once you’re done with creating the questionnaire, click on Next on the top right corner and you’ll be redirected to a new page.
Here you can add all relevant details for the exam like the Exam Title, Exam Description, Total Marks, Passing Marks, etc., and choose whether you will allow re-attempts, if yes, then number of re-attempts allowed, will the exam be timed or not, will the results be released immediately after submission or later, and more.
Upon adding all the details, click on the Next button, and now see the assessment in the editing panel.

Note: Before submitting their exam for assessment, your students will see a final Submission Confirmation pop-up to prevent accidental submissions. This ensures a confident, error-free process for your students. 
Now, let’s create a manual scoring exam from scratch too.
Click on ‘Create from Scratch’ and you’ll be redirected to an empty screen with no questions.
Click on ‘Add Question’ and pick the type of question you would like the assessment to have.
Since this is manual scoring, you cannot pick correct answers for the questions. You will also have to add the marks for each questions manually.
Click ‘Preview’ to check how the assessment will look like to the users.
After you click ‘Next’ once you’re satisfied with the questionnaire you’ll be redirected to a new window.

Fill in the details such as Exam Title, Exam Description, Total Marks, Passing Marks etc and hit Next.
You can now successfully see the assessment in the editing panel of the lessons.
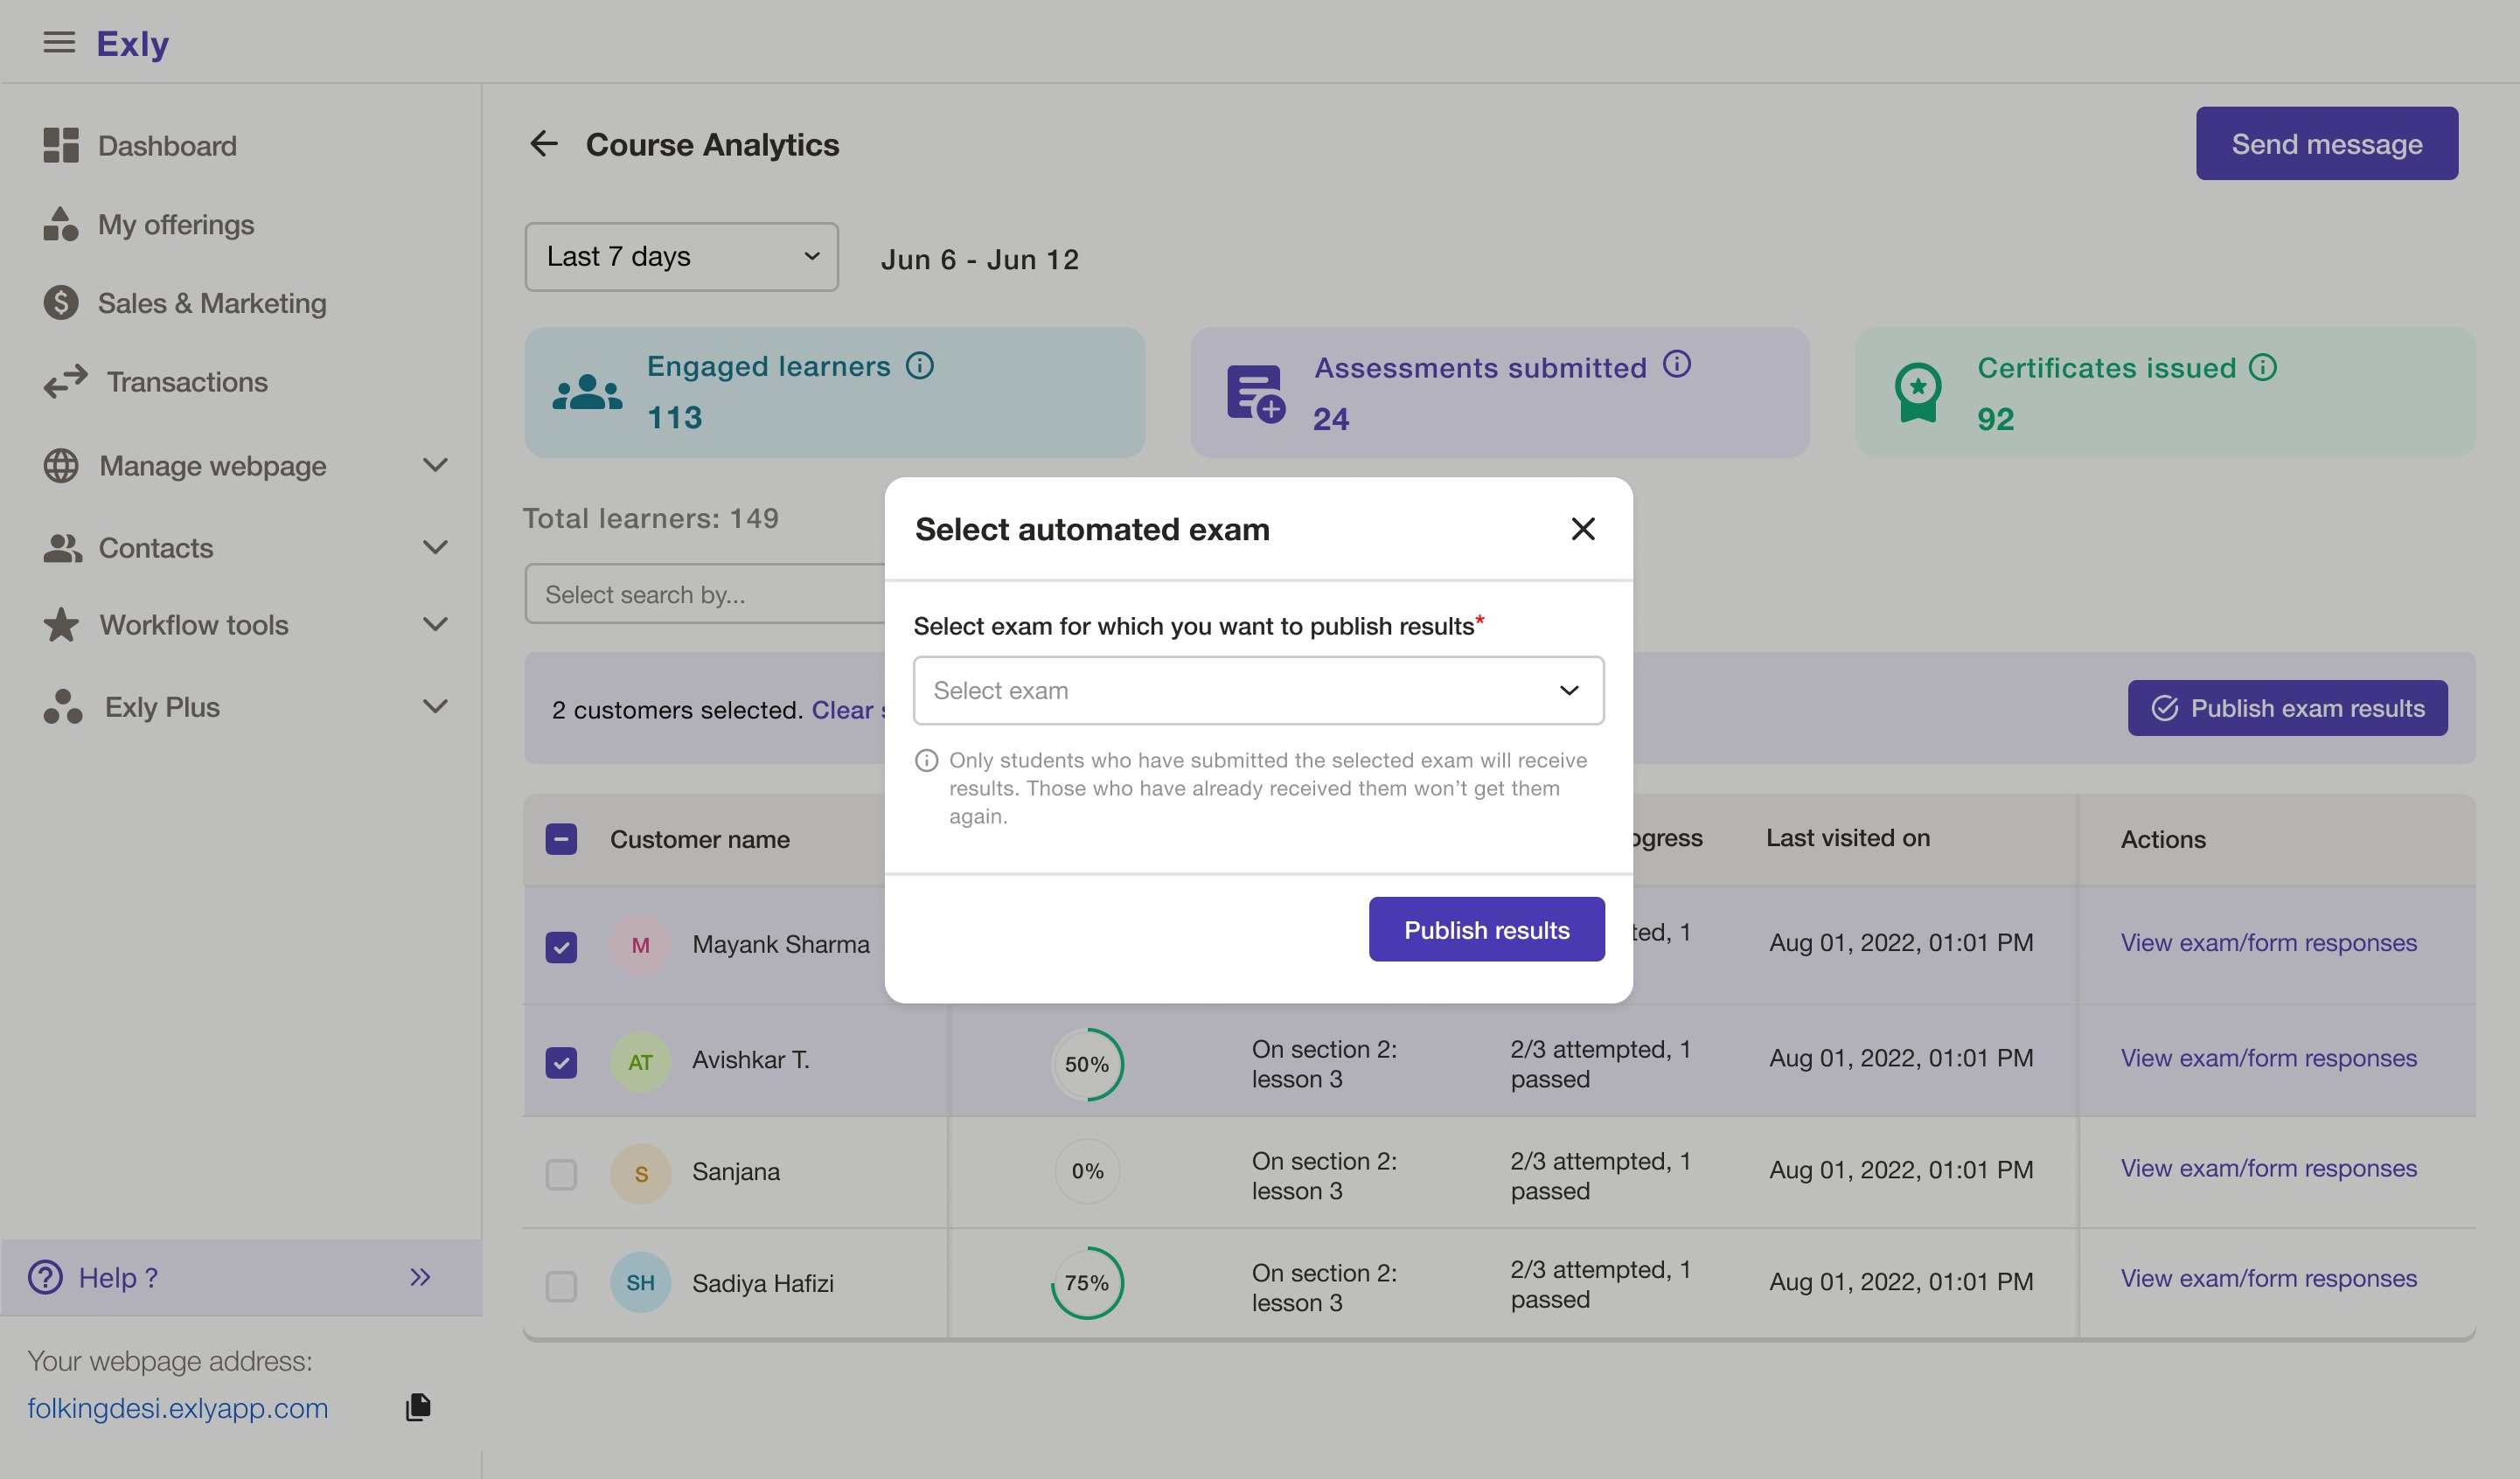
Note: Once the results for the exams are published, the students can access an in-depth report. These include scores, time taken, correct/incorrect answers, and marks per response. You can enable or disable this feature for individual exams during the creation process. 
Form
Click on Form and you'll be shown 2 types of form option to create from:
Single form: Create a one-time form for standalone surveys, quizzes, or feedback in your course.
Progress tracking form: Reuse a form at multiple points in your course, tracking all responses in one table. One thing to note is - If you edit a progress tracking form in one place, the changes will reflect in all its sibling progress tracking forms, making it convenient and consistent.


We’ve provided templates of most used forms. You can choose to pick a template and edit it according to your course or you can also choose to start a blank form.
If you pick a template, you’ll have to edit it’s title.
A window with sample questions will open. Here you can edit the existing questions and also add more of your own.
You can also make questions mandatory using the toggle button when you’re trying to edit a question.
You can add 7 types of questions in forms

Short text: Open ended question where uses will have to type a descriptive answer
Single Correct: An MCQ question with only one selectable answer
Multiple Correct: An MCQ question with multiple selectable answer
Star Rating: A question with 5 stars given and users will have to fill the select a possible rating (1-star, 2-star, 3-star, 4-star or 5-star)
Number Scale Rating: A question where the user will have to give a rating from either 1-5 or 1-10 (you can choose the range of the scale)
Date: This will present a calendar to the student where they can pick a date
File Upload: The users can upload a file. Only image, video and pfd type file uploads are allowed.
Click Next and you can now see the form in the editing panel of the lesson.
Remember that the students can edit their forms until they complete the course.
Once a form is created and saved, you can find the three dot menu on the form. In this menu, you'll find various actions that you can take on the form:
- Edit form: Visit the edit flow of the form easily.
- Copy form link: Share these links easily with customers, and they’ll be taken straight to the form without needing to navigate through the course.
- Duplicate form: Set it up once, and make copies in seconds—no more repetitive work.
--
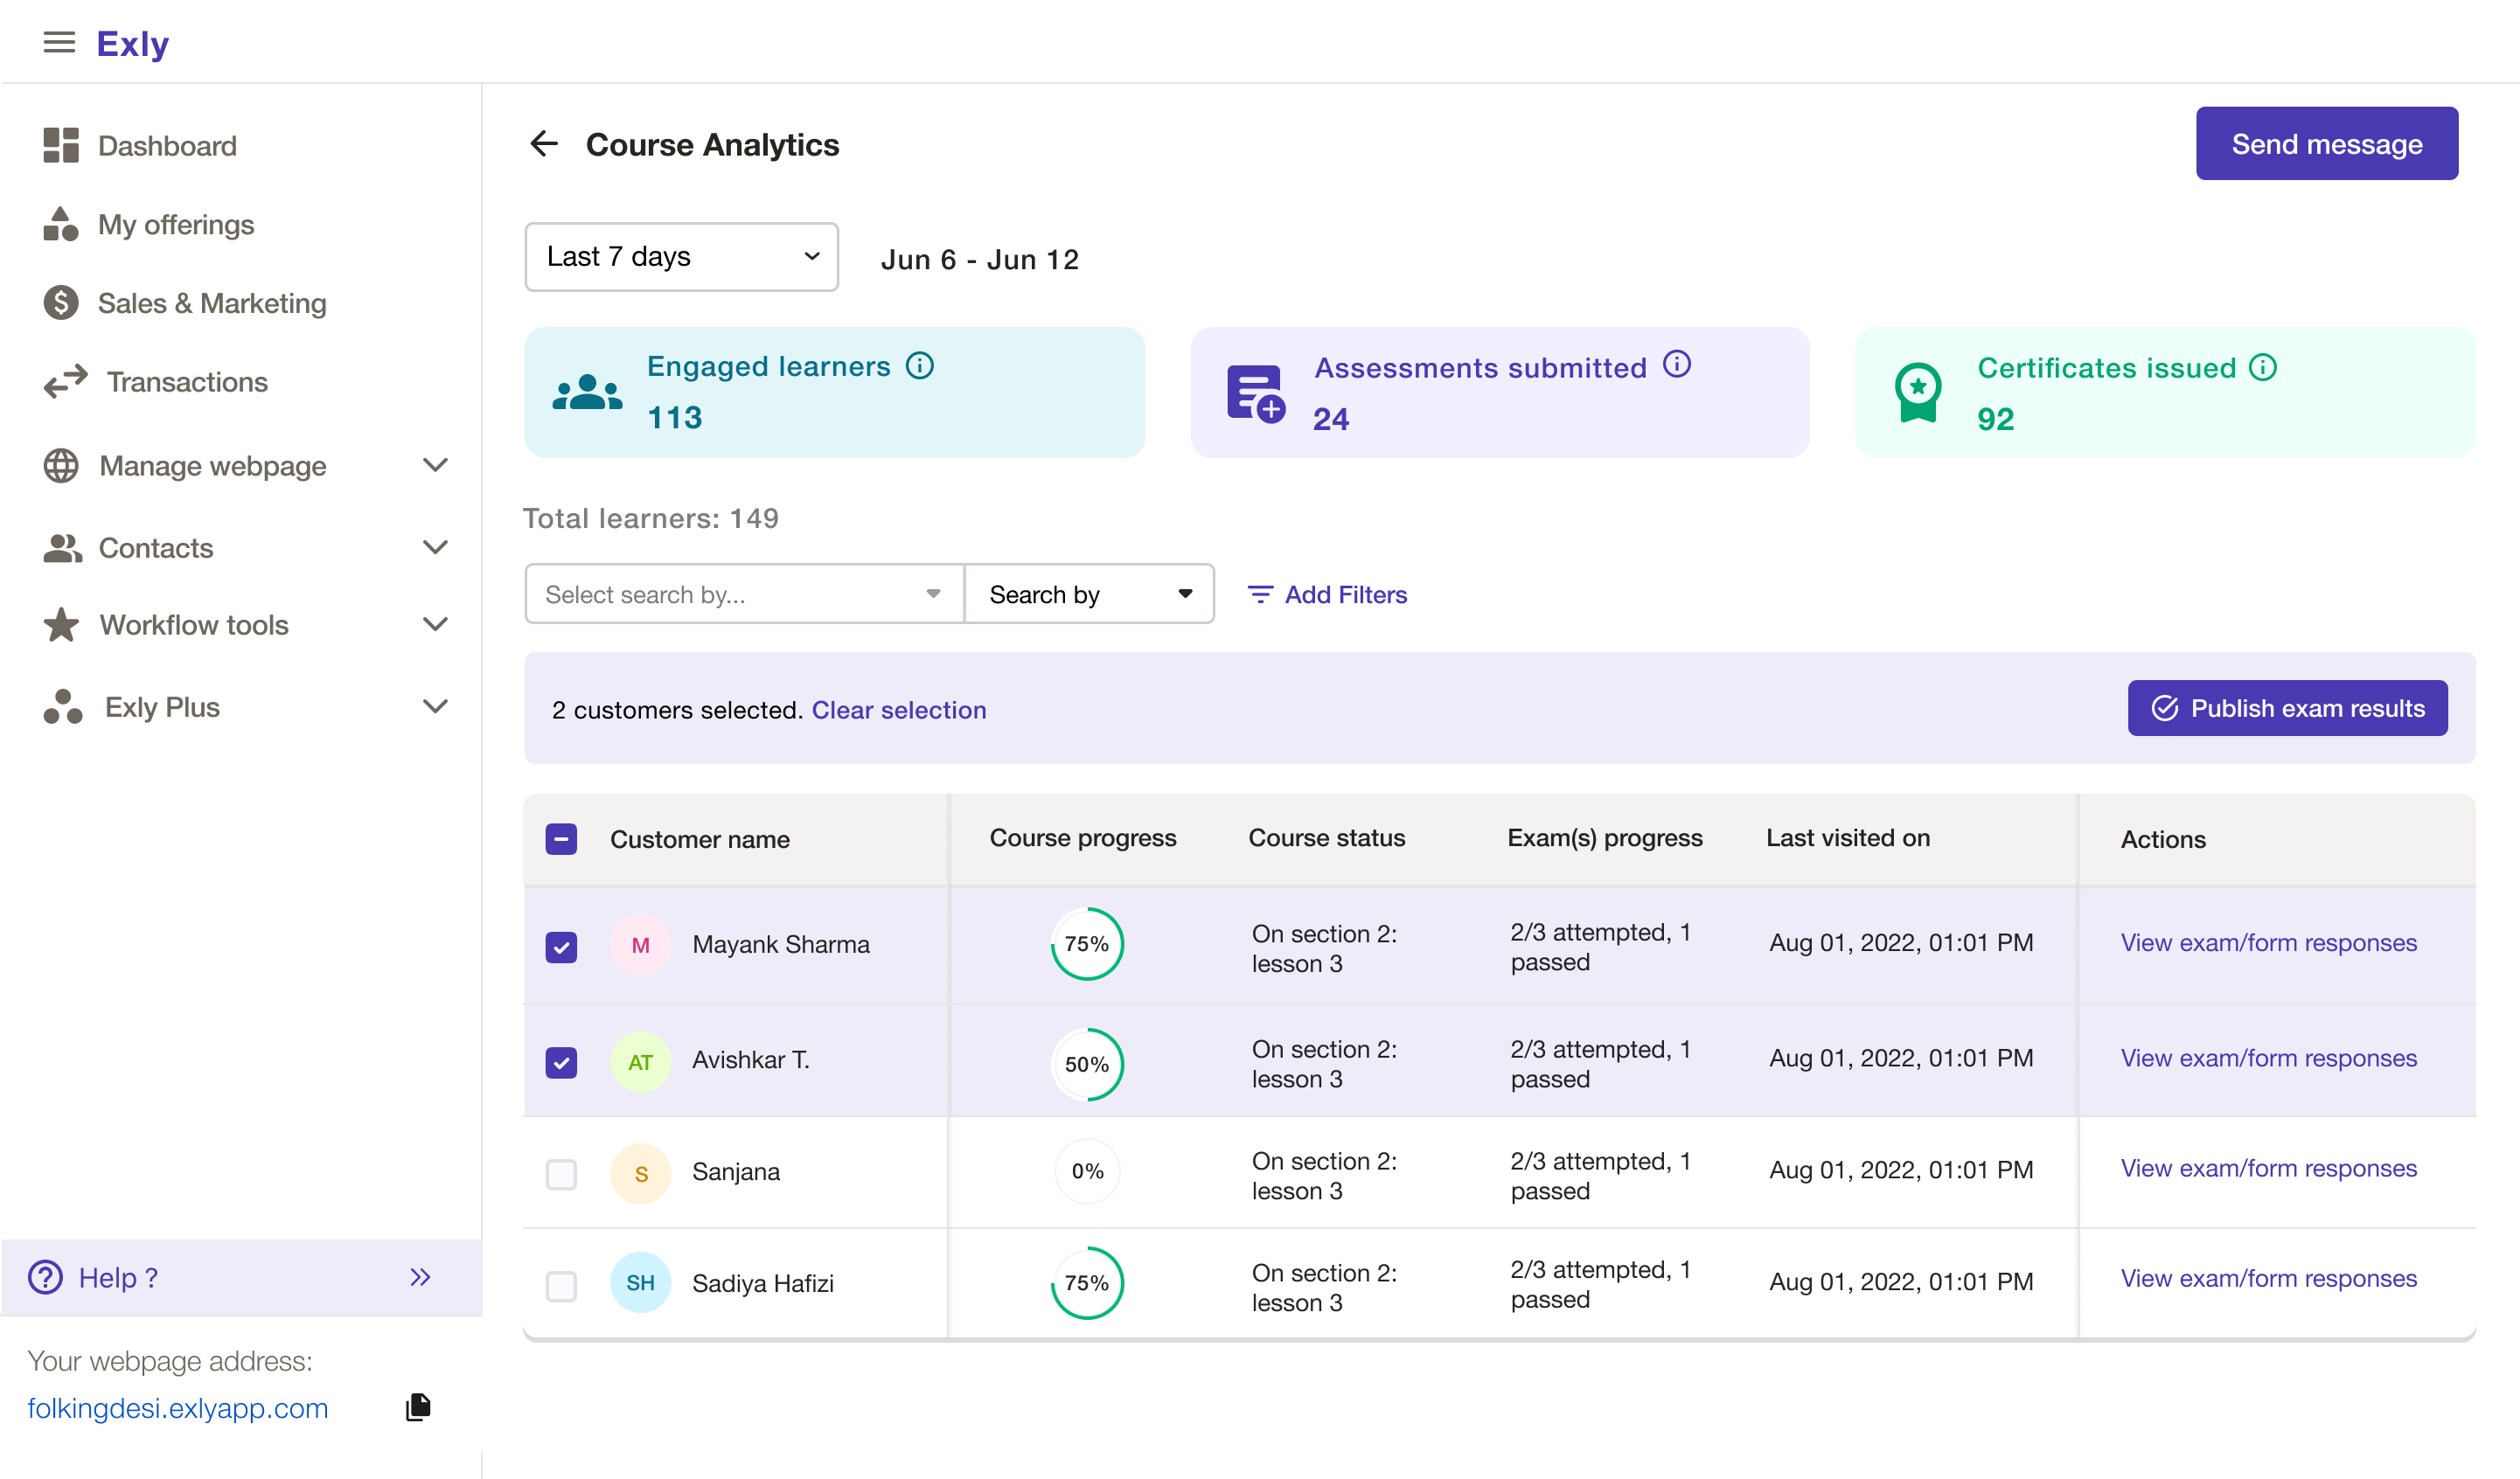
You can find the responses to these forms in Course Analytics. You can also create a Leaderboard for the users who access your course and nudge them to perform well.
Step 4: After adding all the course and lesson details, click on Next.

You'll be redirected to the Course Details page where you have the option to add a cover photo for the offering, a brief course description, and additional instructions.
A default cover photo is set for every offering you create, but if you wish to personalize the offering and change the default photo, you can do so by clicking on the Change Cover Photo option. You may upload an image from your device or search for a stock image.
Although adding a course description and additional instructions for the offering is optional, it is always a good idea to give a brief description or highlight a couple of key points that you have focused on/covered in the course. This gives the enrollees an idea of what they are signing up for and thus be better prepared for the same. In it, you can also include the prerequisites for undertaking this course.
You can choose to show the curriculum on events page by toggling on the button. Enabling this will showcase your course curriculum on your course event page and give visitors a peek before purchasing the course.

Choose when you would like to unlock the sections of the course.


Immediately: All sections will be availiable as soon as the user buys the course
On Specific Date: You can choose the dates on which each section will be unlocked. This can happen in case, say, the course is yet to be launched.
After certain days of starting course: Pick the duration of unlocking all the sections after the user buys the course
After learner has completed previous section: The user can access the next section only when they’re completed the section before it.
After publishing the course, you can update the unlocking settings at any time. However, any changes will only apply to new customers, while the unlocking settings for existing customers will remain unchanged.
You can also choose to unlock each lesson after the previous lessons is completed by the user.

Based on payment of instalments: Unlock the sections based on the payment plan of the user.
You can toggle on the auto-completion of courses for users.


Add a certificate that the students will receive when they complete the course. If is optional but providing a certificate provides a sense of achievement to the students and also stands for your course’s credibility.
After adding the certificate, you can also choose when the user is eligible to receive it. They can get this certificate once,
They finish all lessons
They pass a specific exam
They pass all the exams
Lastly, you can add the validity of the course. It can either be:
Lifetime: The user has permanent course access
Fixed weeks after the purchase: The user can access the course only for certain number of weeks after they make the payment
Additional instructions are optional but it is always a good practise to provide prerequisites or instructions to the students who will be taking your course.
You can also enable the Comments within courses by clicking on the toggle button.
With the Comments feature, you can improve the interaction experience and get your students to engage with the course content by allowing them to leave their remarks or queries. Both you and your students can also Like and Reply to the added comments allowing discussions to continue through threaded comment chains. Not just that, you can even respond to the comments with images upto 5MB in size.
You will receive real-time notifications each time there's a new comment or reply posted in the course to ensure no engagement is missed.

Step 5: Click Next on the top right corner after filling all the course details.
You'll now be redirected to the Pricing Page. Here, fill in more details — the price of the offering, who will bear the booking fees, course validity, etc.
The price that you added for the offering on the first page will automatically appear in the Price field. However, you can always edit it. Make sure you add the pricing details in INR (Indian Rupee) only
If you are on the premium plan, you can set a price in USD for your international client.
You can also allow users to pay for the course in instalments. Select the initial payment amount then add the number of instalments, price for each instalment and their time of payment.
Each time an offering is bought on Exly, there’s a booking fee that gets added to the price. However, you have the option to choose who will bear that booking fee - you (the creator) or the end-user. You can choose the preferred option from the drop-down menu
The breakup of the amount is auto-generated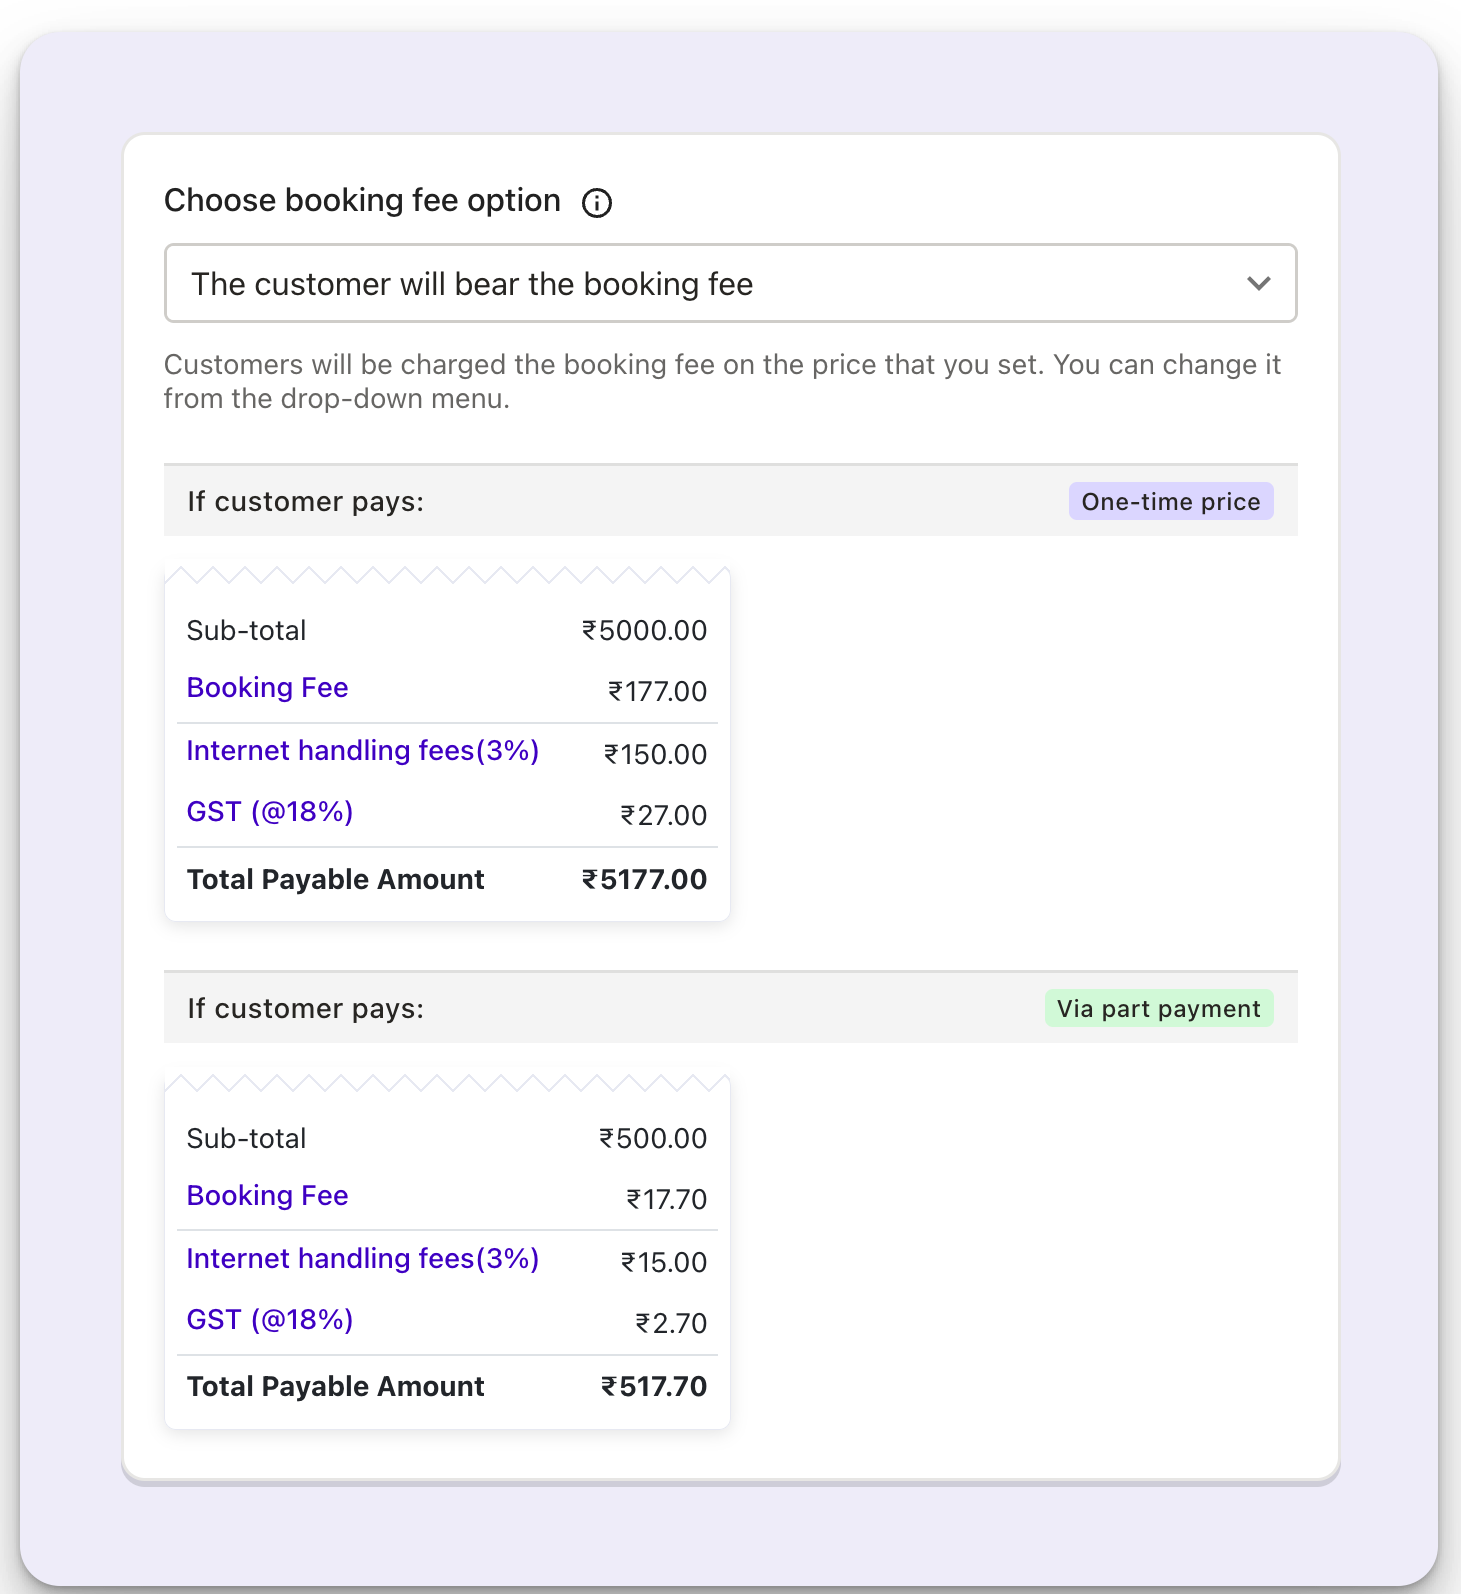
Mention highlights of the course and requirements if any.

If you’re on the premium plan and have team members added to your Add/Manage Staff tab, then you also have the option to assign this offering to any of them. The offering will, however, be assigned to you (the creator or owner) by default at first.

Once you have made all the additions, click on Next. You will be redirected to a new page where you can review all the details added.
After reviewing the details of the offering, you can either Publish the offering right away or click on Edit to make more changes.
Once you publish your offering, a confirmation screen will appear along with the Invite Link.
If required, you can also revoke access to a course for a customer. To do so, follow the below-mentioned steps:
- Visit the 'All Customers' view.

- Click on the name of the respective customer (for whom the access is to be revoked)
- Visit the 'Activity' tab and click on 'Content purchased validity'

- Navigate to the course where you want to revoke the access and click on 'Change expiry date'.

- Set the access expiry date of your choice and click on 'Update'.

The customer's access will be revoked immediately. (They won't be notified of it).
Similarly, if you need to extend the customer's course access, you can add a future date and click on 'Update'.
Additionally, you also get an option to copy the checkout page link and share it with your customers.

The checkout page automatically picks the description you've added to the offering. By entering only the purchase details such as name, email & number, you can now easily take payments from your customers and grow your business.

Was this article helpful?
That’s Great!
Thank you for your feedback
Sorry! We couldn't be helpful
Thank you for your feedback
Feedback sent
We appreciate your effort and will try to fix the article