Imagine you're running a restaurant, and you want to make sure you're serving up the best experience for all your customers. You can't just treat everyone the same way, right? That's where customer segments come in. It's like having different groups of friends who all have their own quirks and preferences.
By segmenting your customer base into these different groups, you can tailor your offerings and the way you interact with each segment. It's all about understanding the unique needs and preferences of each customer group and catering to them accordingly.
Creating Segments in Exly:
Segments by Exly helps you to send targeted, high-converting communications to your customers and new leads. It allows you to keep a specific set of customers who you know will lead to higher conversions updated with all the latest information about your business and offerings and thus earn more revenue.
How to use the Segments tool on Exly?
Follow this step-by-step guide to use the Segments tool on Exly:
Step 1: On the Creator Tool page, scroll down to the Contacts menu, and click on Segments.
Step 2:
On the right side of the page, you will see a list with two tabs - Customers and Leads that are further segregated into six and two segments respectively.
Step 3: Under the Customers tab, your customers are divided into 6 segments based on their purchasing behaviour and how they engage with your offerings.
Most valuable customers: Customers who have spent most on your offerings
Most loyal customers: Customers who have done most number of bookings
Customers who bought your most expensive offering: Customers who have bought your highest paying tickets
Customers who love you: Customers who have given you a rating of ≥4 for any offering.
Customers who love discounts: Customers who buy an offering only when discounts and offers are provided
Low engaging customer: Customers who have not made any purchase in the last 1 month.
These segments are further segregated into the number of customers, bookings per segment, revenue, total WhatsApp messages sent, Average WhatsApp open rate, Total emails sent, and Average Email open rate.

Step 4: As for the data under the Leads tab, 2 segments have already been created.
Hot Leads: Leads who have given their details for an offering but have not made any payment yet.
New Leads: Leads who have been captured in the last 24 hours.
The segments are further divided into Leads, total WhatsApp messages sent, Average WhatsApp open rate, Total emails sent, and Average Email open rate.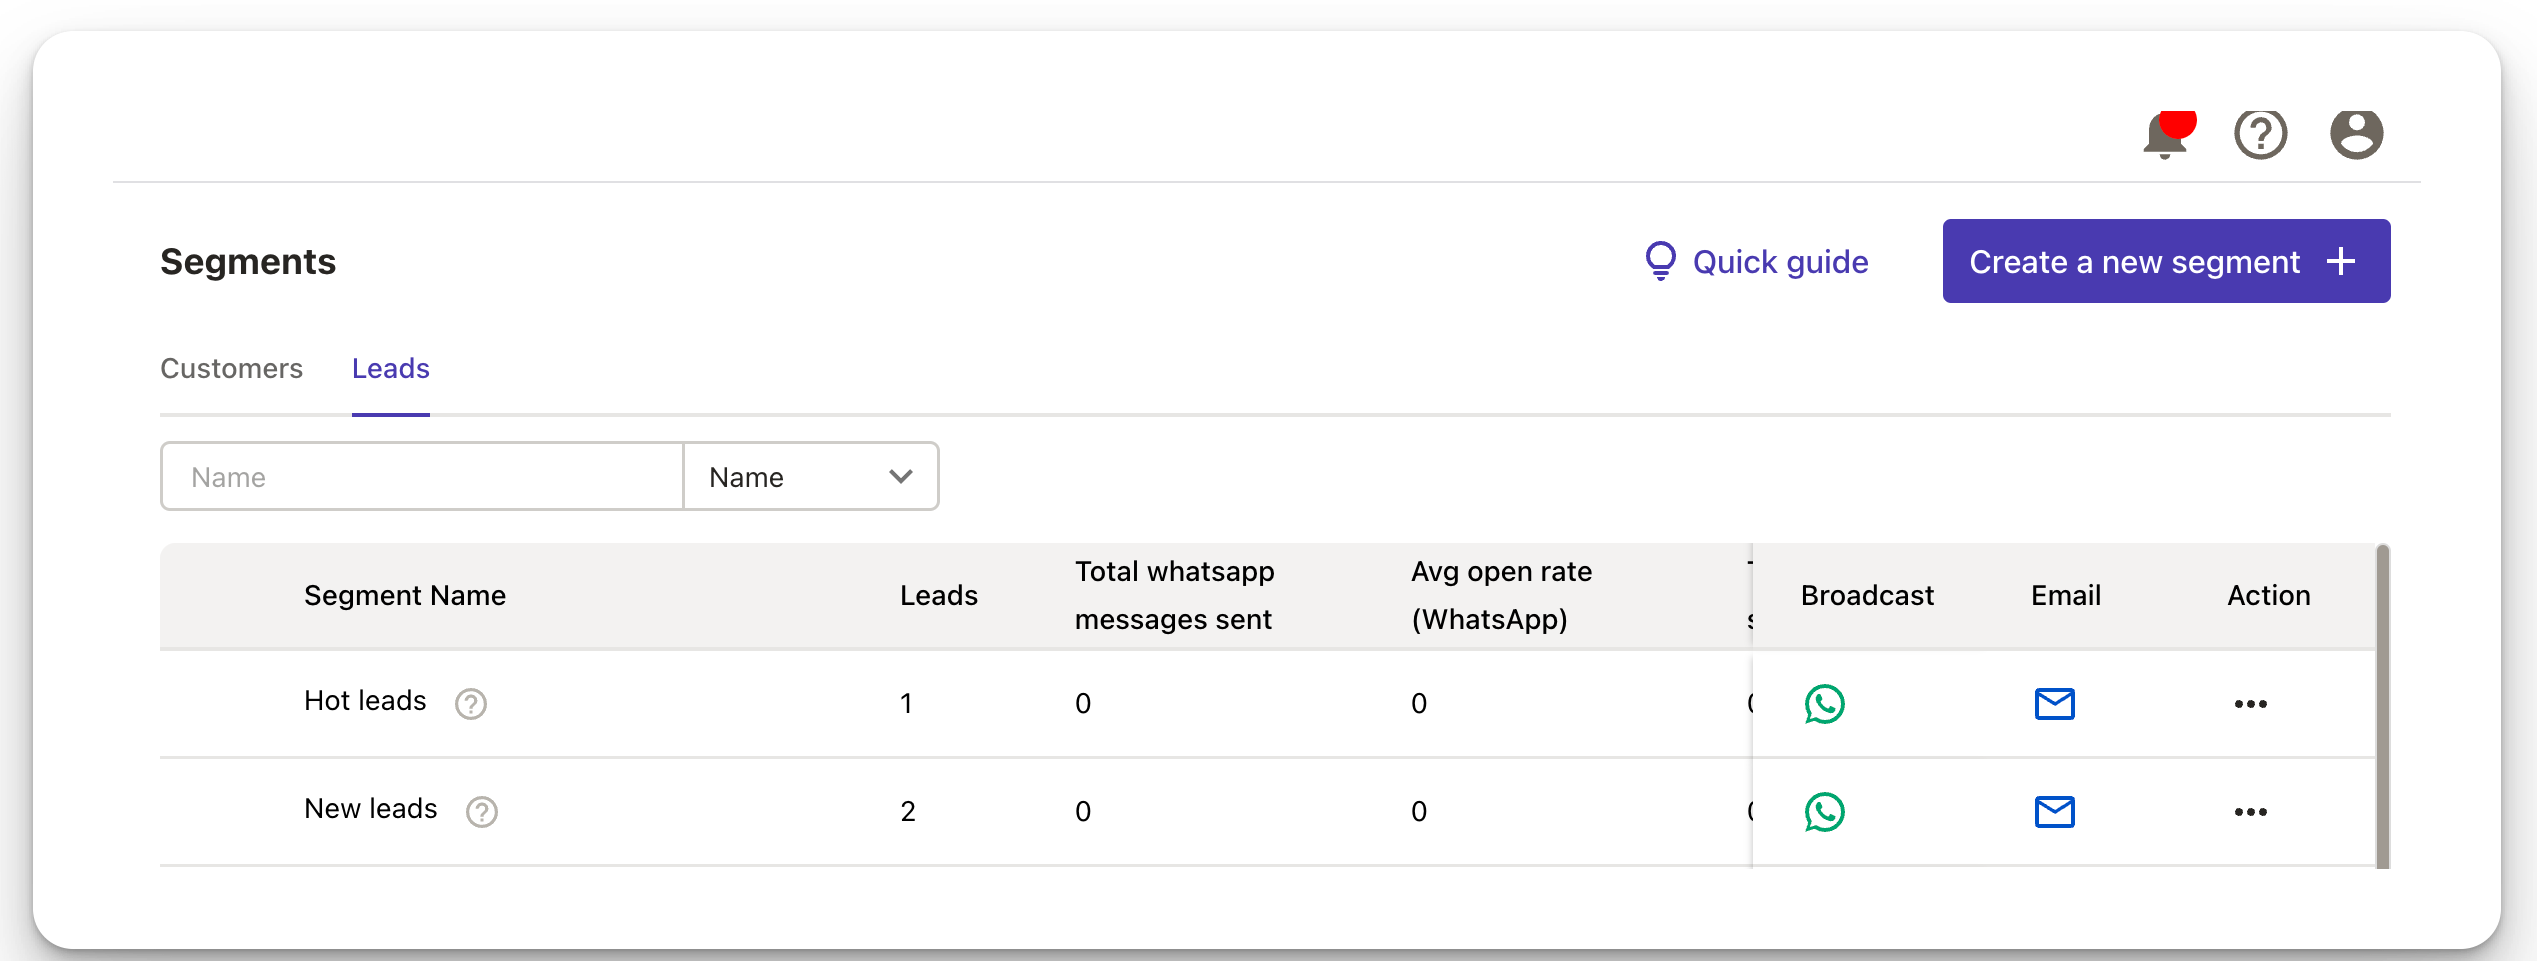
Creating a new segment:
Click on Create a Segment.

From the pop up select if you want to create a segment for Customers or Leads. Click on Set conditions for segment to continue to the next screen.

From the screen opened, change the name of the segment.
You can now add conditions using the Add Condition button.
Multiple conditions can be linked by adding And/Or conditions.
And Conditions: People who satisfy all the conditions will be added to the segment.
Or Condition: People who satisfy any 1 of the condition will be added.
To add a condition you have to choose 3 things
Field: The parameter you want to check

Operator: Now put the operator condition. They vary based on the field.

Value: Now add the value for which you want to check the condition.
Once all the fields have been added, you can now Save the condition.
After adding all the necessary condition, you can now create the segment by clicking on the Create button. If you want to check the number of customers falling in the segment before creating it, click in Preview Customer

For each of these segments you can now
Send a whatsapp broadcast:
Click on the Whatsapp icon under the Broadcast column.
A screen will open from where you can select the message for the broadcast message.
You can pick from the Default Templates provided by Exly or select from custom templates created by you from My Templates. [Learn more about creating custom templates from here]

After selecting the template, click on Next and move to the next screen.

Add the details for the broadcast message such as campaign name, offering title, offering date and more relevant details based on the template you picked.

After adding the information, you can now either send the message now by clicking on the Broadcast Now button or schedule it for a later date by clicking on the Clock Icon
Send an Email Campaign:
Click on the Email icon under the Email column.
Now add the subject line and compose the the email you want to send. Learn more here.

After creating the email, you can now Preview it to see how it will look to the reader. Once satisfied with the email, you can either post it immediately by clicking the Send button or schedule it for a later date by clicking the Clock icon.

Actions for each segment
Click on the three dot menu under the Action Menu.

Here you’ll see three options
View Conditions: Check the condition for setting each segment. From here you also edit these conditions.
Communications Sent: Check all the emails and Whatsapp broadcasts sent to this segment.
Duplicate Segment: You can duplicate a segment and make a copy of it.
Delete Segment: You can also delete segment from this menu. Remember you can only delete segments that have been created by you.
View/Edit Segment:
Click on View and Edit Segment from the three dot menu under Actions menu
To edit an existing condition, click on the first Pen icon on the left of the condition and make the changes.
To copy the same condition, click on the second Copy icon.
To delete a condition, click on the last icon.

To edit a segment, click on Edit button in the bottom left of the screen.
Click on Add Condition and enter the details for the condition in the new window that pops up.
Click on Save and your new segment is ready.
Click on Communications Sent from the three dot menu under Actions menu
Here you can see all the Whatsapp broadcasts and Emails sent to a segment.To delete or duplicate a segment, click on the three dot menu under Actions menu
Click on Delete Segment. A pop up will appear asking for confirmation. Click on Delete to delete the segment.
Click on Duplicate Segment to copy the exact same condition from a particular segment. A window will open.
You can add new conditions to this segment too. If you want to duplicate the segment as it is, click Create button in the button.

Segmentation helps you plan your campaigns and communication in the most efficient way possible.
Was this article helpful?
That’s Great!
Thank you for your feedback
Sorry! We couldn't be helpful
Thank you for your feedback
Feedback sent
We appreciate your effort and will try to fix the article